
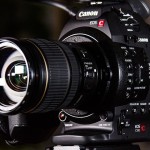
Canon EOS-C100 Tips Collection
Category : Workflow

Canon EOS-C100 Tips Collection
- In order to get real progressive material out of AVCHD 25PFS/30PFS modes set or interpret the clips to progressive manually in your NLE – the clips are 25p but interlaced in when imported to the NLE using progressive in a interlaced movie container! Real 24p is available when switching to NTSC (set System Frequency to 60hz)
- You can not record movies in differnt frame rate (PAL/NTSC) on the same internal SD Card, but you can do so to the external Ninja2!
- The C100 cannot record 50p/60p but you can record 50i or 59,94i and later deinterlace with your NLE. It’s nearly FullHD and way way nicer and sharper then a 7D’s 720@60p!
- The C100 can record out to the Ninja2 without a SD Card in the Camera – just enable the HDMI Record Command!
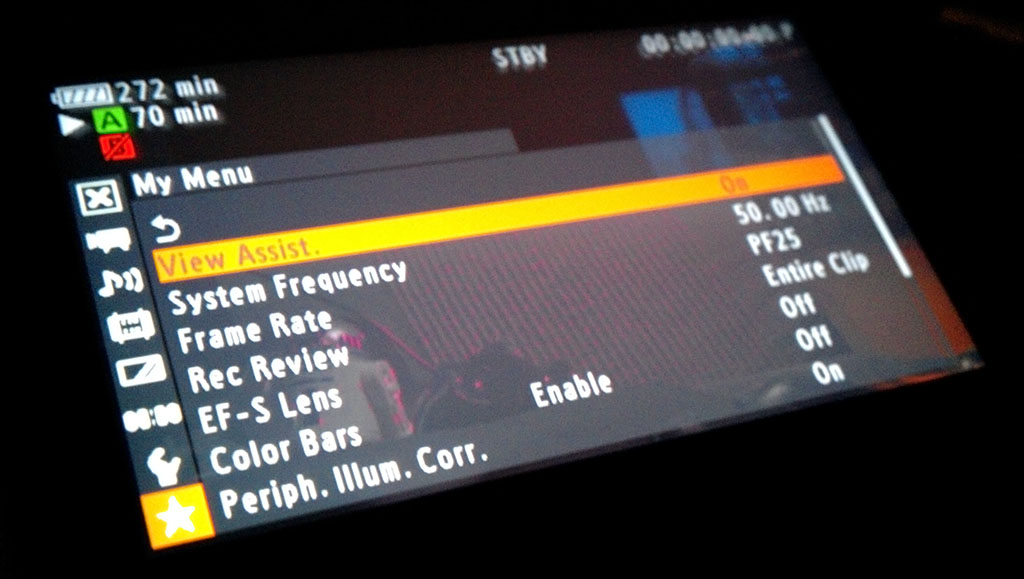
- Assign the “My Menu” to assignable function button #14 (Shutter), because you can access Shutter nearly as fast with the joystick navigation.
- The user button #8 (Magn.) is perfect for the “View Assist” mode. This is usefull if you film with C-Log and want to quickly switch the “Graded C-Log Preview” on and off.
- My personal preference for the “My Menu“: System Frequency / Frame Rate / Rec Review / EF-S Lens / Color Bars / Periph. Illum. Corr. / Time Code / ABB / Initialize SD-A
- C100 User Manual
- Set your lens autofocus to MF (Manual Focus) if you want to move around the expanded focus assist crop-frame! Otherwise the zoom is locked to the center.
- Copy whole SD-Card structure to keep timecode for MTS files intact! At least when using Premiere CC! Ingesting movies with Adobe Prelude is also a good tip to add even more metadata and usefull clip-naming. UPDATE: Premiere needs the folder “BDMV” in order to read the clip-timecode.
The current complete Menu Setting from my C100, including all Custom Picture Profiles in the camera.
Last update: 2013-11-20 – including settings for november 2013 firmware update
[ MENU FILE ] MODEL : "Canon EOS C100" Light Metering : Standard AE Shift : +-0 ISO/Gain - Select : ISO ISO/Gain - Extended Range : On ISO/Gain - ISO Increment : 1/3 stop ISO/Gain - Gain : Normal Iris - Mode : Manual Iris - Iris Increment : 1/3 stop Iris - Zoom-Iris Correct. : On Shutter - Mode : Angle Shutter - Shutter Increment : 1/4 stop AF Mode : One Shot Flicker Reduction : Off CP CINEMA Locked : Off EF-S Lens : On Color Bars - Enable : Off Color Bars - Type : EBU Periph.Illum.Corr. : On Audio Input - Int. Mic Low Cut : LC1 Audio Input - Int. Mic Sensitivity : Normal Audio Input - MIC/Int. Mic Att. : Off Audio Input - MIC Mode : Automatic Audio Input - MIC Level : 50 Audio Input - XLR Rec Channel : CH1 Audio Input - XLR1 Mic Trimming : 0 dB Audio Input - XLR2 Mic Trimming : 0 dB Audio Input - XLR1 Mic Att. : Off Audio Input - XLR2 Mic Att. : Off Audio Input - XLR ALC Link : Separated Audio Input - Limiter : Off Audio Input - 1 kHz Tone : Off Audio Output - Monitor Delay : Normal Audio Output - Channel : CH1/CH2 Audio Output - Level : 1 Vrms Audio Output - Headphone Volume : 13 Audio Output - Speaker Volume (MEDIA Mode) : 15 Character Display : VF HD Onscreen Disp. : Off SD Onscreen Disp. : Off Resize SD Output (MEDIA Mode) : Squeeze LCD Setup - Brightness : -5 LCD Setup - Contrast : +-0 LCD Setup - Color : +5 LCD Setup - Sharpness : 2 LCD Setup - Backlight : Bright VF Setup - Brightness : -10 VF Setup - Contrast : +45 VF Setup - Color : +10 VF Setup - Sharpness : 1 VF Setup - Backlight : Bright LCD/VF B&W : Off LCD/VF Simul. : Off View Assist. : On Peaking : Off Select : Peaking 2 Peaking 1 - Color : Red Peaking 1 - Gain : 8 Peaking 1 - Frequency : 2 Peaking 2 - Color : Red Peaking 2 - Gain : 15 Peaking 2 - Frequency : 1 Zebra : Off Select : Zebra 1&2 Zebra 1 Level : 70 +-5% Zebra 2 Level : 100% Zebra HD Output : Off Markers - Enable : Off Markers - Center : Off Markers - Horizontal : Off Markers - Grid : Off Markers - Safety Zone : Off Markers - Safety Zone Area : 95% Markers - Aspect Marker : White Markers - Aspect Ratio : 2.35:1 Audio Level (MEDIA Mode) : On Custom Display 1 - Light Metering : On Custom Display 1 - Custom Picture : On Custom Display 1 - Focal Length : On Custom Display 1 - ND Filter : On Custom Display 1 - AF Mode : On Custom Display 1 - Key Lock : On Custom Display 1 - White Balance : On Custom Display 1 - Exposure : On Custom Display 1 - Iris : On Custom Display 1 - ISO/Gain : On Custom Display 1 - Shutter : On Custom Display 1 - Peaking : On Custom Display 1 - Magnification : On Custom Display 1 - View Assist. : On Custom Display 1 - EF-S Lens : On Custom Display 1 - Lens : On Custom Display 2 - Remaining Battery : Normal Custom Display 2 - Remaining Rec Time : Normal Custom Display 2 - Rec Mode : On Custom Display 2 - Time Code : On Custom Display 2 - Photo : Normal Custom Display 2 - Bit Rate : On Custom Display 2 - Frame Rate : On Custom Display 2 - Character Rec : On Custom Display 2 - Output Display : Off Custom Display 2 - User Bit : Off Custom Display 2 - Audio Output CH : On Custom Display 2 - Audio Level : On Custom Display 2 - HDMI Rec Command : On Custom Display 2 - Temperature/Fan : On Custom Display 2 - Date/Time : Off Date/Time : On Time Code - Mode : Preset Time Code - Run : Rec Run Time Code - DF/NDF : DF Time Code - Setting : 00:00:00:00 User Bit - Output Mode : Fixed User Bit - Type : Date User Bit - Type - UserBit : 00 00 00 00 Time Zone : UTC+01:00 Central Europe Set Clock - Date Format : YMD/24H WFM (LCD) - Setting : WFM WFM (LCD) - Setting (MEDIA Mode) : Off WFM (LCD) - Waveform Monitor : Line+Spot WFM (LCD) - Waveform Monitor Gain : 1x WFM (LCD) - Edge Monitor : Type 1 WFM (LCD) - Edge Monitor Gain : 12 Language : English Assign Button - 1 : Backlight Assign Button - 2 : Spotlight Assign Button - 3 : Photo Assign Button - 4 : Headphone - Assign Button - 5 : Time Code Assign Button - 6 : Headphone + Assign Button - 7 : MAGN. Assign Button - 8 : View Assist. Assign Button - 9 : PEAKING Assign Button - 10 : ZEBRA Assign Button - 11 : WFM Assign Button - 12 : Markers Assign Button - 13 : EF-S Lens Assign Button - 14 : My Menu Assign Button - 15 : ONE-SHOT AF Assign Button - 7 (MEDIA Mode) : MAGN. Assign Button - 8 (MEDIA Mode) : Headphone + Assign Button - 9 (MEDIA Mode) : Headphone - Assign Button - 10 (MEDIA Mode) : ZEBRA Assign Button - 11 (MEDIA Mode) : WFM Assign Button - 12 (MEDIA Mode) : Speaker + Assign Button - 13 (MEDIA Mode) : Speaker - Assign Button - 14 (MEDIA Mode) : Clips - Delete - All Assign Button - 15 (MEDIA Mode) : ONE-SHOT AF Tally Lamp - Front : Off Tally Lamp - Rear : On Media Access LED : On Fan : Automatic System Frequency : 50.00 Hz Relay Rec : On Double Slot Rec : Off Bit Rate : 24 Mbps LPCM Frame Rate : PF25 Pre Rec : Off Rec Review : Entire Clip HDMI - Time Code : On HDMI - Rec Command : On Photos - File Numbering : Continu. Photos - Add CP File : On Custom Function - Shockless WB : Off Custom Function - AE Response : Slow Custom Function - Grip Ctrl Dial Dir. : Normal Custom Function - F. Assist. B&W : Off Custom Function - Magn. Add. Disp. : Off Custom Function - Scan Reverse Rec : Off Custom Function - Character Rec : Off Custom Function - Key START/STOP : Off My Menu - 1 : View Assist. My Menu - 2 : System Frequency My Menu - 3 : Frame Rate My Menu - 4 : Rec Review My Menu - 5 : EF-S Lens My Menu - 6 : Color Bars - Enable My Menu - 7 : Periph.Illum.Corr. My Menu - 8 : Time Code - Setting My Menu - 9 : Time Code - Run My Menu - 10 : ABB My Menu - 11 : InitializeSD A - Quick My Menu - 12 : (NONE) My Menu - 13 : (NONE) My Menu - 14 : (NONE) Rename : "NTtc1c " Protect : Unprotect Gamma : Cine 1 Black - Master Pedestal : +16 Black - Master Black - Red : +0 Black - Master Black - Green : +0 Black - Master Black - Blue : +0 Black Gamma - Level : +8 Black Gamma - Range : +6 Black Gamma - Point : +4 Low Key Satur. - Enable : On Low Key Satur. - Level : +18 Knee - Enable : Off Knee - Slope : -15 Knee - Point : 109 Knee - Saturation : +0 Sharpness - Level : -10 Sharpness - H Detail Freq. : +0 Sharpness - Coring - Level : +0 Sharpness - Coring - D-Ofst : 0 Sharpness - Coring - D-Curve : 0 Sharpness - Coring - D-Depth : +0 Sharpness - HV Detail Bal. : +0 Sharpness - Limit : +0 Sharpness - Select : 0 Sharpness - Knee Aperture - Gain : 0 Sharpness - Knee Aperture - Slope : 1 Sharpness - Level Depend - Level : 0 Sharpness - Level Depend - Slope : 0 Sharpness - Level Depend - Offset : 0 Noise Reduction : Off Skin Detail - Effect Level : Off Skin Detail - Hue : 0 Skin Detail - Chroma : 0 Skin Detail - Area : 31 Skin Detail - Y Level : 31 Selective NR - Effect Level : Off Selective NR - Hue : 0 Selective NR - Chroma : 16 Selective NR - Area : 16 Selective NR - Y Level : 16 Color Matrix - Select : Cine 1 Color Matrix - Gain : -8 Color Matrix - Phase : +0 Color Matrix - R-G : +8 Color Matrix - R-B : +12 Color Matrix - G-R : +0 Color Matrix - G-B : +8 Color Matrix - B-R : +0 Color Matrix - B-G : +0 White Balance - R Gain : +0 White Balance - B Gain : +0 Color Correction - Select Area : Off Color Correction - Area A Setting - Phase : 7 Color Correction - Area A Setting - Chroma : 8 Color Correction - Area A Setting - Area : 16 Color Correction - Area A Setting - Y Level : 16 Color Correction - Area A Revision - Level : +5 Color Correction - Area A Revision - Phase : -18 Color Correction - Area B Setting - Phase : 0 Color Correction - Area B Setting - Chroma : 16 Color Correction - Area B Setting - Area : 16 Color Correction - Area B Setting - Y Level : 16 Color Correction - Area B Revision - Level : +0 Color Correction - Area B Revision - Phase : +0 Other Functions - Setup Level - Level : -20 Other Functions - Setup Level - Press : Off Other Functions - Clip At 100% : Off Rename : "NTtc1cN " Protect : Unprotect Gamma : Cine 1 Black - Master Pedestal : +16 Black - Master Black - Red : +0 Black - Master Black - Green : +0 Black - Master Black - Blue : +0 Black Gamma - Level : +8 Black Gamma - Range : +6 Black Gamma - Point : +4 Low Key Satur. - Enable : On Low Key Satur. - Level : +18 Knee - Enable : Off Knee - Slope : -15 Knee - Point : 109 Knee - Saturation : +0 Sharpness - Level : -10 Sharpness - H Detail Freq. : +0 Sharpness - Coring - Level : +0 Sharpness - Coring - D-Ofst : 0 Sharpness - Coring - D-Curve : 0 Sharpness - Coring - D-Depth : +0 Sharpness - HV Detail Bal. : +0 Sharpness - Limit : +0 Sharpness - Select : 0 Sharpness - Knee Aperture - Gain : 0 Sharpness - Knee Aperture - Slope : 1 Sharpness - Level Depend - Level : 0 Sharpness - Level Depend - Slope : 0 Sharpness - Level Depend - Offset : 0 Noise Reduction : Off Skin Detail - Effect Level : Off Skin Detail - Hue : 0 Skin Detail - Chroma : 0 Skin Detail - Area : 31 Skin Detail - Y Level : 31 Selective NR - Effect Level : Off Selective NR - Hue : 0 Selective NR - Chroma : 16 Selective NR - Area : 16 Selective NR - Y Level : 16 Color Matrix - Select : Cine 1 Color Matrix - Gain : -8 Color Matrix - Phase : +0 Color Matrix - R-G : +0 Color Matrix - R-B : +0 Color Matrix - G-R : +0 Color Matrix - G-B : +0 Color Matrix - B-R : +0 Color Matrix - B-G : +0 White Balance - R Gain : +0 White Balance - B Gain : +0 Color Correction - Select Area : Off Color Correction - Area A Setting - Phase : 7 Color Correction - Area A Setting - Chroma : 8 Color Correction - Area A Setting - Area : 16 Color Correction - Area A Setting - Y Level : 16 Color Correction - Area A Revision - Level : +5 Color Correction - Area A Revision - Phase : -18 Color Correction - Area B Setting - Phase : 0 Color Correction - Area B Setting - Chroma : 16 Color Correction - Area B Setting - Area : 16 Color Correction - Area B Setting - Y Level : 16 Color Correction - Area B Revision - Level : +0 Color Correction - Area B Revision - Phase : +0 Other Functions - Setup Level - Level : -20 Other Functions - Setup Level - Press : Off Other Functions - Clip At 100% : Off Rename : "NTtc2b1 " Protect : Unprotect Gamma : Cine 2 Black - Master Pedestal : +19 Black - Master Black - Red : +0 Black - Master Black - Green : +0 Black - Master Black - Blue : +0 Black Gamma - Level : +12 Black Gamma - Range : +6 Black Gamma - Point : +6 Low Key Satur. - Enable : On Low Key Satur. - Level : +15 Knee - Enable : Off Knee - Slope : -15 Knee - Point : 109 Knee - Saturation : +0 Sharpness - Level : -10 Sharpness - H Detail Freq. : +0 Sharpness - Coring - Level : +0 Sharpness - Coring - D-Ofst : 0 Sharpness - Coring - D-Curve : 0 Sharpness - Coring - D-Depth : +0 Sharpness - HV Detail Bal. : +0 Sharpness - Limit : +0 Sharpness - Select : 0 Sharpness - Knee Aperture - Gain : 0 Sharpness - Knee Aperture - Slope : 1 Sharpness - Level Depend - Level : 0 Sharpness - Level Depend - Slope : 0 Sharpness - Level Depend - Offset : 0 Noise Reduction : Off Skin Detail - Effect Level : Off Skin Detail - Hue : 0 Skin Detail - Chroma : 9 Skin Detail - Area : 16 Skin Detail - Y Level : 16 Selective NR - Effect Level : Off Selective NR - Hue : 0 Selective NR - Chroma : 16 Selective NR - Area : 16 Selective NR - Y Level : 16 Color Matrix - Select : Cine 2 Color Matrix - Gain : -8 Color Matrix - Phase : +0 Color Matrix - R-G : +12 Color Matrix - R-B : +8 Color Matrix - G-R : +0 Color Matrix - G-B : -8 Color Matrix - B-R : +0 Color Matrix - B-G : +0 White Balance - R Gain : +0 White Balance - B Gain : +0 Color Correction - Select Area : Off Color Correction - Area A Setting - Phase : 7 Color Correction - Area A Setting - Chroma : 8 Color Correction - Area A Setting - Area : 16 Color Correction - Area A Setting - Y Level : 16 Color Correction - Area A Revision - Level : +5 Color Correction - Area A Revision - Phase : -18 Color Correction - Area B Setting - Phase : 0 Color Correction - Area B Setting - Chroma : 16 Color Correction - Area B Setting - Area : 16 Color Correction - Area B Setting - Y Level : 16 Color Correction - Area B Revision - Level : +0 Color Correction - Area B Revision - Phase : +0 Other Functions - Setup Level - Level : -20 Other Functions - Setup Level - Press : Off Other Functions - Clip At 100% : Off Rename : "NTtc2b1N" Protect : Unprotect Gamma : Cine 2 Black - Master Pedestal : +19 Black - Master Black - Red : +0 Black - Master Black - Green : +0 Black - Master Black - Blue : +0 Black Gamma - Level : +12 Black Gamma - Range : +6 Black Gamma - Point : +6 Low Key Satur. - Enable : On Low Key Satur. - Level : +15 Knee - Enable : Off Knee - Slope : -15 Knee - Point : 109 Knee - Saturation : +0 Sharpness - Level : -10 Sharpness - H Detail Freq. : +0 Sharpness - Coring - Level : +0 Sharpness - Coring - D-Ofst : 0 Sharpness - Coring - D-Curve : 0 Sharpness - Coring - D-Depth : +0 Sharpness - HV Detail Bal. : +0 Sharpness - Limit : +0 Sharpness - Select : 0 Sharpness - Knee Aperture - Gain : 0 Sharpness - Knee Aperture - Slope : 1 Sharpness - Level Depend - Level : 0 Sharpness - Level Depend - Slope : 0 Sharpness - Level Depend - Offset : 0 Noise Reduction : Off Skin Detail - Effect Level : Off Skin Detail - Hue : 0 Skin Detail - Chroma : 9 Skin Detail - Area : 16 Skin Detail - Y Level : 16 Selective NR - Effect Level : Off Selective NR - Hue : 0 Selective NR - Chroma : 16 Selective NR - Area : 16 Selective NR - Y Level : 16 Color Matrix - Select : Cine 2 Color Matrix - Gain : -8 Color Matrix - Phase : +0 Color Matrix - R-G : +0 Color Matrix - R-B : +0 Color Matrix - G-R : +0 Color Matrix - G-B : +0 Color Matrix - B-R : +0 Color Matrix - B-G : +0 White Balance - R Gain : +0 White Balance - B Gain : +0 Color Correction - Select Area : Off Color Correction - Area A Setting - Phase : 7 Color Correction - Area A Setting - Chroma : 8 Color Correction - Area A Setting - Area : 16 Color Correction - Area A Setting - Y Level : 16 Color Correction - Area A Revision - Level : +5 Color Correction - Area A Revision - Phase : -18 Color Correction - Area B Setting - Phase : 0 Color Correction - Area B Setting - Chroma : 16 Color Correction - Area B Setting - Area : 16 Color Correction - Area B Setting - Y Level : 16 Color Correction - Area B Revision - Level : +0 Color Correction - Area B Revision - Phase : +0 Other Functions - Setup Level - Level : -20 Other Functions - Setup Level - Press : Off Other Functions - Clip At 100% : Off Rename : "NTclog2c" Protect : Unprotect Gamma : Canon Log Black - Master Pedestal : -2 Black - Master Black - Red : +0 Black - Master Black - Green : +0 Black - Master Black - Blue : +0 Black Gamma - Level : +0 Black Gamma - Range : +0 Black Gamma - Point : +0 Low Key Satur. - Enable : On Low Key Satur. - Level : +6 Knee - Enable : Off Knee - Slope : +0 Knee - Point : 95 Knee - Saturation : +0 Sharpness - Level : -10 Sharpness - H Detail Freq. : +0 Sharpness - Coring - Level : +0 Sharpness - Coring - D-Ofst : 0 Sharpness - Coring - D-Curve : 0 Sharpness - Coring - D-Depth : +0 Sharpness - HV Detail Bal. : +0 Sharpness - Limit : +0 Sharpness - Select : 0 Sharpness - Knee Aperture - Gain : 0 Sharpness - Knee Aperture - Slope : 1 Sharpness - Level Depend - Level : 0 Sharpness - Level Depend - Slope : 0 Sharpness - Level Depend - Offset : 0 Noise Reduction : Off Skin Detail - Effect Level : Off Skin Detail - Hue : 0 Skin Detail - Chroma : 16 Skin Detail - Area : 16 Skin Detail - Y Level : 16 Selective NR - Effect Level : Off Selective NR - Hue : 0 Selective NR - Chroma : 16 Selective NR - Area : 16 Selective NR - Y Level : 16 Color Matrix - Select : Canon Log Color Matrix - Gain : -12 Color Matrix - Phase : +0 Color Matrix - R-G : +8 Color Matrix - R-B : +12 Color Matrix - G-R : +0 Color Matrix - G-B : +8 Color Matrix - B-R : +0 Color Matrix - B-G : +0 White Balance - R Gain : +0 White Balance - B Gain : +0 Color Correction - Select Area : Off Color Correction - Area A Setting - Phase : 0 Color Correction - Area A Setting - Chroma : 16 Color Correction - Area A Setting - Area : 16 Color Correction - Area A Setting - Y Level : 16 Color Correction - Area A Revision - Level : +0 Color Correction - Area A Revision - Phase : +0 Color Correction - Area B Setting - Phase : 0 Color Correction - Area B Setting - Chroma : 16 Color Correction - Area B Setting - Area : 16 Color Correction - Area B Setting - Y Level : 16 Color Correction - Area B Revision - Level : +0 Color Correction - Area B Revision - Phase : +0 Other Functions - Setup Level - Level : -3 Other Functions - Setup Level - Press : Off Other Functions - Clip At 100% : Off Rename : "CINEMAEX" Protect : Unprotect Gamma : Canon Log Black - Master Pedestal : -2 Black - Master Black - Red : +0 Black - Master Black - Green : +0 Black - Master Black - Blue : +0 Black Gamma - Level : +0 Black Gamma - Range : +0 Black Gamma - Point : +0 Low Key Satur. - Enable : Off Low Key Satur. - Level : +0 Knee - Enable : Off Knee - Slope : +0 Knee - Point : 95 Knee - Saturation : +0 Sharpness - Level : -10 Sharpness - H Detail Freq. : +0 Sharpness - Coring - Level : +0 Sharpness - Coring - D-Ofst : 0 Sharpness - Coring - D-Curve : 0 Sharpness - Coring - D-Depth : +0 Sharpness - HV Detail Bal. : +0 Sharpness - Limit : +0 Sharpness - Select : 0 Sharpness - Knee Aperture - Gain : 0 Sharpness - Knee Aperture - Slope : 1 Sharpness - Level Depend - Level : 0 Sharpness - Level Depend - Slope : 0 Sharpness - Level Depend - Offset : 0 Noise Reduction : Off Skin Detail - Effect Level : Off Skin Detail - Hue : 0 Skin Detail - Chroma : 16 Skin Detail - Area : 16 Skin Detail - Y Level : 16 Selective NR - Effect Level : Off Selective NR - Hue : 0 Selective NR - Chroma : 16 Selective NR - Area : 16 Selective NR - Y Level : 16 Color Matrix - Select : Canon Log Color Matrix - Gain : +0 Color Matrix - Phase : +0 Color Matrix - R-G : +0 Color Matrix - R-B : +0 Color Matrix - G-R : +0 Color Matrix - G-B : +0 Color Matrix - B-R : +0 Color Matrix - B-G : +0 White Balance - R Gain : +0 White Balance - B Gain : +0 Color Correction - Select Area : Off Color Correction - Area A Setting - Phase : 0 Color Correction - Area A Setting - Chroma : 16 Color Correction - Area A Setting - Area : 16 Color Correction - Area A Setting - Y Level : 16 Color Correction - Area A Revision - Level : +0 Color Correction - Area A Revision - Phase : +0 Color Correction - Area B Setting - Phase : 0 Color Correction - Area B Setting - Chroma : 16 Color Correction - Area B Setting - Area : 16 Color Correction - Area B Setting - Y Level : 16 Color Correction - Area B Revision - Level : +0 Color Correction - Area B Revision - Phase : +0 Other Functions - Setup Level - Level : -3 Other Functions - Setup Level - Press : Off Other Functions - Clip At 100% : Off Rename : "BT709 " Protect : Unprotect Gamma : Normal 3 Black - Master Pedestal : +13 Black - Master Black - Red : +0 Black - Master Black - Green : +0 Black - Master Black - Blue : +0 Black Gamma - Level : +0 Black Gamma - Range : +0 Black Gamma - Point : +0 Low Key Satur. - Enable : Off Low Key Satur. - Level : +25 Knee - Enable : On Knee - Slope : -15 Knee - Point : 109 Knee - Saturation : +0 Sharpness - Level : -10 Sharpness - H Detail Freq. : +0 Sharpness - Coring - Level : +0 Sharpness - Coring - D-Ofst : 0 Sharpness - Coring - D-Curve : 0 Sharpness - Coring - D-Depth : +0 Sharpness - HV Detail Bal. : +0 Sharpness - Limit : +0 Sharpness - Select : 0 Sharpness - Knee Aperture - Gain : 0 Sharpness - Knee Aperture - Slope : 1 Sharpness - Level Depend - Level : 0 Sharpness - Level Depend - Slope : 0 Sharpness - Level Depend - Offset : 0 Noise Reduction : Off Skin Detail - Effect Level : Off Skin Detail - Hue : 0 Skin Detail - Chroma : 16 Skin Detail - Area : 16 Skin Detail - Y Level : 16 Selective NR - Effect Level : Off Selective NR - Hue : 0 Selective NR - Chroma : 16 Selective NR - Area : 16 Selective NR - Y Level : 16 Color Matrix - Select : Normal 3 Color Matrix - Gain : +0 Color Matrix - Phase : +0 Color Matrix - R-G : +0 Color Matrix - R-B : +0 Color Matrix - G-R : +0 Color Matrix - G-B : +0 Color Matrix - B-R : +0 Color Matrix - B-G : +0 White Balance - R Gain : +0 White Balance - B Gain : +0 Color Correction - Select Area : Off Color Correction - Area A Setting - Phase : 0 Color Correction - Area A Setting - Chroma : 16 Color Correction - Area A Setting - Area : 16 Color Correction - Area A Setting - Y Level : 16 Color Correction - Area A Revision - Level : +0 Color Correction - Area A Revision - Phase : +0 Color Correction - Area B Setting - Phase : 0 Color Correction - Area B Setting - Chroma : 16 Color Correction - Area B Setting - Area : 16 Color Correction - Area B Setting - Y Level : 16 Color Correction - Area B Revision - Level : +0 Color Correction - Area B Revision - Phase : +0 Other Functions - Setup Level - Level : -20 Other Functions - Setup Level - Press : Off Other Functions - Clip At 100% : Off Rename : "Wide DR " Protect : Protect Gamma : Wide DR Black - Master Pedestal : +0 Black - Master Black - Red : +0 Black - Master Black - Green : +0 Black - Master Black - Blue : +0 Black Gamma - Level : +0 Black Gamma - Range : +0 Black Gamma - Point : +0 Low Key Satur. - Enable : Off Low Key Satur. - Level : +0 Knee - Enable : Off Knee - Slope : +0 Knee - Point : 95 Knee - Saturation : +0 Sharpness - Level : -2 Sharpness - H Detail Freq. : +0 Sharpness - Coring - Level : +0 Sharpness - Coring - D-Ofst : 0 Sharpness - Coring - D-Curve : 0 Sharpness - Coring - D-Depth : +0 Sharpness - HV Detail Bal. : +0 Sharpness - Limit : +0 Sharpness - Select : 0 Sharpness - Knee Aperture - Gain : 0 Sharpness - Knee Aperture - Slope : 1 Sharpness - Level Depend - Level : 0 Sharpness - Level Depend - Slope : 0 Sharpness - Level Depend - Offset : 0 Noise Reduction : Off Skin Detail - Effect Level : Off Skin Detail - Hue : 0 Skin Detail - Chroma : 16 Skin Detail - Area : 16 Skin Detail - Y Level : 16 Selective NR - Effect Level : Off Selective NR - Hue : 0 Selective NR - Chroma : 16 Selective NR - Area : 16 Selective NR - Y Level : 16 Color Matrix - Select : Wide DR Color Matrix - Gain : +0 Color Matrix - Phase : +0 Color Matrix - R-G : +0 Color Matrix - R-B : +0 Color Matrix - G-R : +0 Color Matrix - G-B : +0 Color Matrix - B-R : +0 Color Matrix - B-G : +0 White Balance - R Gain : +0 White Balance - B Gain : +0 Color Correction - Select Area : Off Color Correction - Area A Setting - Phase : 0 Color Correction - Area A Setting - Chroma : 16 Color Correction - Area A Setting - Area : 16 Color Correction - Area A Setting - Y Level : 16 Color Correction - Area A Revision - Level : +0 Color Correction - Area A Revision - Phase : +0 Color Correction - Area B Setting - Phase : 0 Color Correction - Area B Setting - Chroma : 16 Color Correction - Area B Setting - Area : 16 Color Correction - Area B Setting - Y Level : 16 Color Correction - Area B Revision - Level : +0 Color Correction - Area B Revision - Phase : +0 Other Functions - Setup Level - Level : +0 Other Functions - Setup Level - Press : Off Other Functions - Clip At 100% : Off Rename : "CINEMA " Protect : Protect Gamma : Canon Log Black - Master Pedestal : -4 Black - Master Black - Red : +0 Black - Master Black - Green : +0 Black - Master Black - Blue : +0 Black Gamma - Level : +0 Black Gamma - Range : +0 Black Gamma - Point : +0 Low Key Satur. - Enable : Off Low Key Satur. - Level : +0 Knee - Enable : Off Knee - Slope : +0 Knee - Point : 95 Knee - Saturation : +0 Sharpness - Level : -10 Sharpness - H Detail Freq. : +0 Sharpness - Coring - Level : +0 Sharpness - Coring - D-Ofst : 0 Sharpness - Coring - D-Curve : 0 Sharpness - Coring - D-Depth : +0 Sharpness - HV Detail Bal. : +0 Sharpness - Limit : +0 Sharpness - Select : 0 Sharpness - Knee Aperture - Gain : 0 Sharpness - Knee Aperture - Slope : 1 Sharpness - Level Depend - Level : 0 Sharpness - Level Depend - Slope : 0 Sharpness - Level Depend - Offset : 0 Noise Reduction : Off Skin Detail - Effect Level : Off Skin Detail - Hue : 0 Skin Detail - Chroma : 16 Skin Detail - Area : 16 Skin Detail - Y Level : 16 Selective NR - Effect Level : Off Selective NR - Hue : 0 Selective NR - Chroma : 16 Selective NR - Area : 16 Selective NR - Y Level : 16 Color Matrix - Select : Canon Log Color Matrix - Gain : +0 Color Matrix - Phase : +0 Color Matrix - R-G : +0 Color Matrix - R-B : +0 Color Matrix - G-R : +0 Color Matrix - G-B : +0 Color Matrix - B-R : +0 Color Matrix - B-G : +0 White Balance - R Gain : +0 White Balance - B Gain : +0 Color Correction - Select Area : Off Color Correction - Area A Setting - Phase : 0 Color Correction - Area A Setting - Chroma : 16 Color Correction - Area A Setting - Area : 16 Color Correction - Area A Setting - Y Level : 16 Color Correction - Area A Revision - Level : +0 Color Correction - Area A Revision - Phase : +0 Color Correction - Area B Setting - Phase : 0 Color Correction - Area B Setting - Chroma : 16 Color Correction - Area B Setting - Area : 16 Color Correction - Area B Setting - Y Level : 16 Color Correction - Area B Revision - Level : +0 Color Correction - Area B Revision - Phase : +0 Other Functions - Setup Level - Level : +16 Other Functions - Setup Level - Press : Off Other Functions - Clip At 100% : Off |
Found a typo or mistake, please feel free to inform office@ntown.at. Thanks for reading.
Article written by Patrick Zadrobilek on 17.Apr.2013 (updated: 20.Nov.2013)
| Subscribe to our Newsletter and get a special discount for our Webshop and a LUT Gift Package! |


MediaScrollerPro
Category : Software

NTown Studio LUT Master Collection
Category : LUT


 Deutsch
Hi, when i copy the settings you are using my videos only have sound on the left side.(left headphone) Using a phantom pwrd shotgun mic.
Sorry to hear, but check your mike-switches on the handle. Nothing is changed in the settings for Audio in the settings file. As far as I know you cannot change recording channels in Menu. Hope that helps!
Thank you so much , that helped. Also reading the manual too. Now i have two channels(after splitting them in post)1 from handle mic and the other one from the shotgun. They both give out sound from both of the earcups also. So its fixed! 🙂 Thanks bunch.
Great little tips, I really love the one of view assist. I was looking to streamline my onset workflow with my c100 and this pretty much is an amazing “update” to me.
Thanks for your kind words, Carlos! 😉
Hi Patrick—
I really appreciate your posts. Helpful. I love my C100. I’m in a bit of a quandary regarding tip #10 (preserving timecode). When I copy the complete card to my raid, then import the AVCHD files via Premiere Pro CS6 or Prelude, timecode is maintained BUT the file names start with 00000.mts, 00001.mts, etc. While I’m grateful to have the timecode, the file names present issues when relinking (specifically, other projects/footage that have the same files names).
My other option/workflow is to use the Data Import Utility (from Pixela—which came with the camera. The AVCHD files are extracted from the card to my raid as individual .mts files with unique names. Great…BUT, I lose the timecode.
So my question is—is there a way to have the best of both worlds? Keep the timecode and have the file names not be the same for each project?
I appreciate any input you have.
~ Brian
There is a way of remuxing the .MTS files to .MOV and adding the timecode with exiftool and ffmbc. This works well and after that you can rename the clips to any name you want – the timecode stays readable in Premiere without the original folder structure.
EXIFTOOL:
http://www.sno.phy.queensu.ca/~phil/exiftool/
FFMBC:
https://code.google.com/p/ffmbc/
The windows batch script:
@echo off"C:\Program Files (x86)\HAMILTON\BIN\exiftool.exe" %1 | find "Time Code" | awk '{print $4}' >_tc
Set /P tc=< _tc del _tc "C:\Program Files\Tools\Multimedia\FFmbc\ffmbc.exe" -i %1 -vcodec copy -acodec pcm_s16le -timecode %tc% %2_h264tc.mov
Hope it helps,
Patrick.
There is a way of remuxing the .MTS files to .MOV and adding the timecode with exiftool and ffmbc. This works well and after that you can rename the clips to any name you want – the timecode stays readable in Premiere without the original folder structure.
EXIFTOOL:
http://www.sno.phy.queensu.ca/~phil/exiftool/
FFMBC:
https://code.google.com/p/ffmbc/
The windows batch script:
@echo offexiftool.exe %1 | find "Time Code" | awk '{print $4}' >_tc
Set /P tc=< _tc
del _tc
ffmbc.exe -i %1 -vcodec copy -acodec pcm_s16le -timecode %tc% %2_h264tc.mov
Hope it helps,
Patrick.
One important thing to add:
The encoding container must be quicktime. Only Quicktime can have timecode.
What I recently used is a re-encode to a LongGOP h264 in a quicktime container with 4:2:2 color subsampling and 50mbit datarate. This method also eliminates the “progressive-in-a-interlaced-container” problem.
Batchscript:
@echo off

exiftool.exe %1 | find "Time Code" | awk '{print $4}' >_tc

Set /P tc=< _tc

del _tc

ffmpeg.exe -i %1 -c:v libx264 -pix_fmt yuv422p -b:v 50M -g 50 -bf 2 -b_strategy 1 -flags +loop -coder 1 -subcmp 2 -cmp 2 -codec:a libvo_aacenc -b:a 256k -timecode %tc% %2_LG5050tc.mov
Greets,
Patrick.