
The Myth of C-LOG

How to get the most out of your C100 or C300, or …
… why it is a bad idea to use Log for 8-bit Codecs?
- The 8-bit problem
- Picture Styles with Logarithmic Gamma
- What’s wrong with Canon C-Log
- Black is good!
- Stretching exercises
- Testing the extremes
- NTown Custom Picture Styles Downloads
- Custom Picture Styles Settings
The 8-bit problem
UPDATE: Read about how to get 10-bit out of the C100 with Atomos Ninja2!
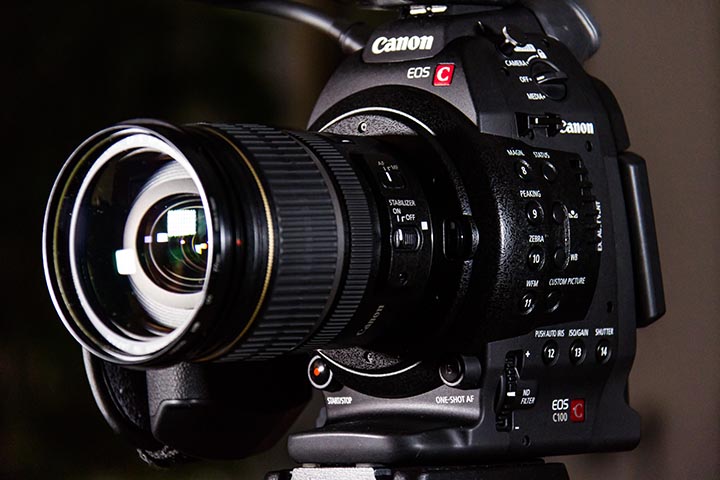
The C300 and the less expensive pendant, the C100, booth does have have a really great image sensor with an unrivaled light sensitivity.
But they are outputting only 8-bit shades red, green and blue as do many other cameras like the Sony FS-100, FS-700 and of course DSLRs.
Canon’s C500 has the same „issue“ with the internal 8-bit codec, except if you use an external recorder which would then record 10-bit or 12-bit Canon RAW – but that’s a different story.
And why in the hell should you not use the Canon C-Log gamma curve? Actually you can and should use it, but not as intendend!

Ungraded Canon C-Log Image
Picture Styles with Logarithmic Gamma
On most cameras the Custom Picture Styles can be modified.
The most popular picture style for Canon DSLRs is Technicolor’s CineStyle which provides a S-type gamma curve for a flatter image to get more details in shadows and highlites and should provide more latitude for later grading. That is theoretically a good thing, but…
The bad thing about it is that this is done within a 8-bit colorspace with 256 shades of grey Canon did it on their Canon S-Log CP as did Technicolor on their CineStyle Picture Style for DSLRs. I wrote about this in my article Technicolor – Hype or Cine-like Mastering.
One important image style aspect comes along with all logarithmic gamma curves is that they are mostly very flat, especially in the midtones where the skintones are located. So with a limiting 8-bit codec you basically get a lot less gradiation steps in skintones and that means when you apply a LUT that brings back contrast your skintones loose a lot of gradiation steps and falling appart fast with ugly unwanted banding effects showing up. So be aware of using too flat gammas with 8-bit codecs.
You can download the Custom Picture Styles for the Canon EOS-C100 at the end of the article.
What’s wrong with Canon C-Log
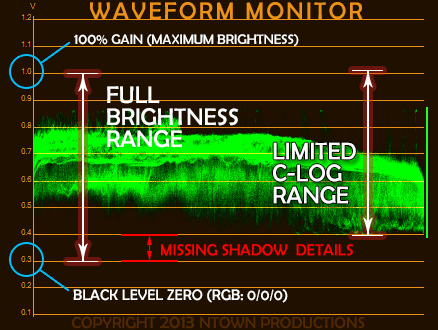
With an 8-bit camera system you need to take care what dynamic range you expose with the given codec. The Canon C-Log has a few issues which a DoP should care about.
Mouseover to see difference:

Read more about the corrected c-log Custom Picture Profile
Firstly the rised black is problematic. The intention for the high black level is to capture any possible shadow detail that is somehow visible to the sensor. The problem here is that with a black level this high you will get noise in shadows pretty fast and this is one thing you dont want in your nice material.
The next problem with the rised black level ist that there are about 16 brightness steps in shadows unused, which are desperately needed if we only have an 8-bit codec available to capture the video.
Secondly the Superwhites or over 100% Gain/Videolevels.
Most nowadays NLEs are capable of handling superwhites in pro-cameras videos, but not the user. The problem whith the „invisible“ Superwhites is that the are just shown as overexposed white in your video. Only when you look at your Waveform Monitor you will see that there ist something brigher than white in your video and that you can take advantage of it.
When lowering the gain in a video with superwhites you propably get some details back from overexposed bright areas in your video. But most of the time you will expose your video somehow correct when using your camera and hence the superwhites are mostly unused brightness steps that we again desperately need when our camera only outputs 8-bit video.
Why not getting the otherwise overexposed whites down to the visible 0-100% and get a even wider dynamic range with the c-log? Lets do it!
So the conclusion is to fintune the original c-log with the Custom Picture Profile settings to fit our needs.
Lowering the black level close to real black that we get all shadow details but nothing is clipped in the black and adjusting the white-level/gain that it shows 100% video-level, but not more. With this settings you will actually see more details in the whites and there is less tweaking with the final video needed.
This way the 8-bit (256 brightness steps) are perfectly used and encoded with the internal codec or with an external recorder like the Ninja or Samurai.
Black is good!
I recently got my Canon C100 and a Ninja2 recorder which records up to 220mbit out of the C100 and has a superiour codec that provides best posible quality for the movies.
With the second most popular picture style, the Canon C-Log, they did nearly the exact same thing like the Technicolor CineStyle for Canon DSLRs, except that the Cinema Series C100/C300 does have a much better sensor to play with.
Waveform behaviour when using C-Log recording vs full dynamic range recording
Dont understand me wrong, the Canon C-Log Custom Picture Style is great and it provides a great latitude, but I think it can be optimized to do a even better job.
But the problem remains. Canon C-Log rises black levels, but you dont get any more details within the dark rised brightness range. So why should we use it, or the better question is why should we use it NOT?
The short answer is: you get more brightness steps and less banding artifacts.
The Canon EF-S 17-55 f2.8 IS is my always on lens. I love this lens, great sharpness from center to edge and one of very few lenses which stays in focus, no matter which focal length – thats rare on photo zoom lenses. Not to mention that I used this lens on my testshoot too ;-).
Please support my website by buying stuff on Amazon using my affiliate links, thanks alot!
But now – let’s continue the test….
Stretching exercises
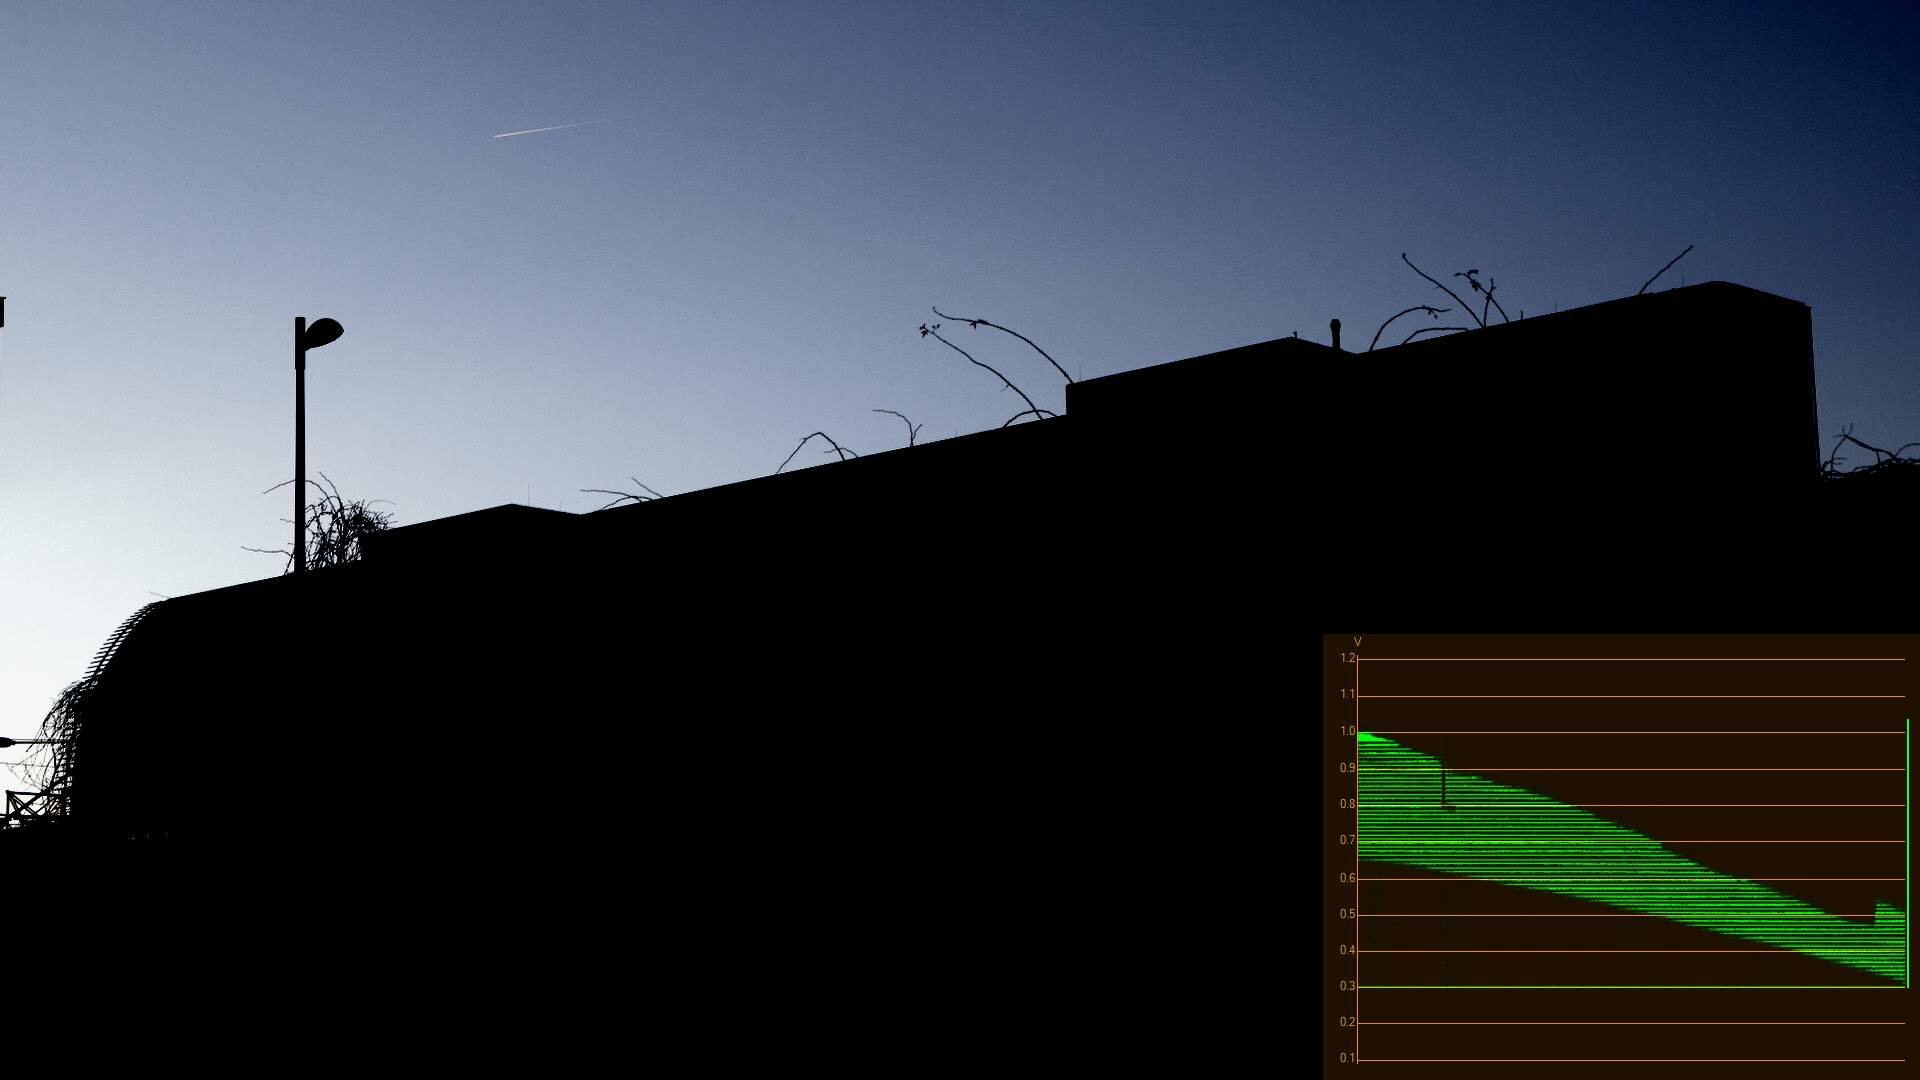
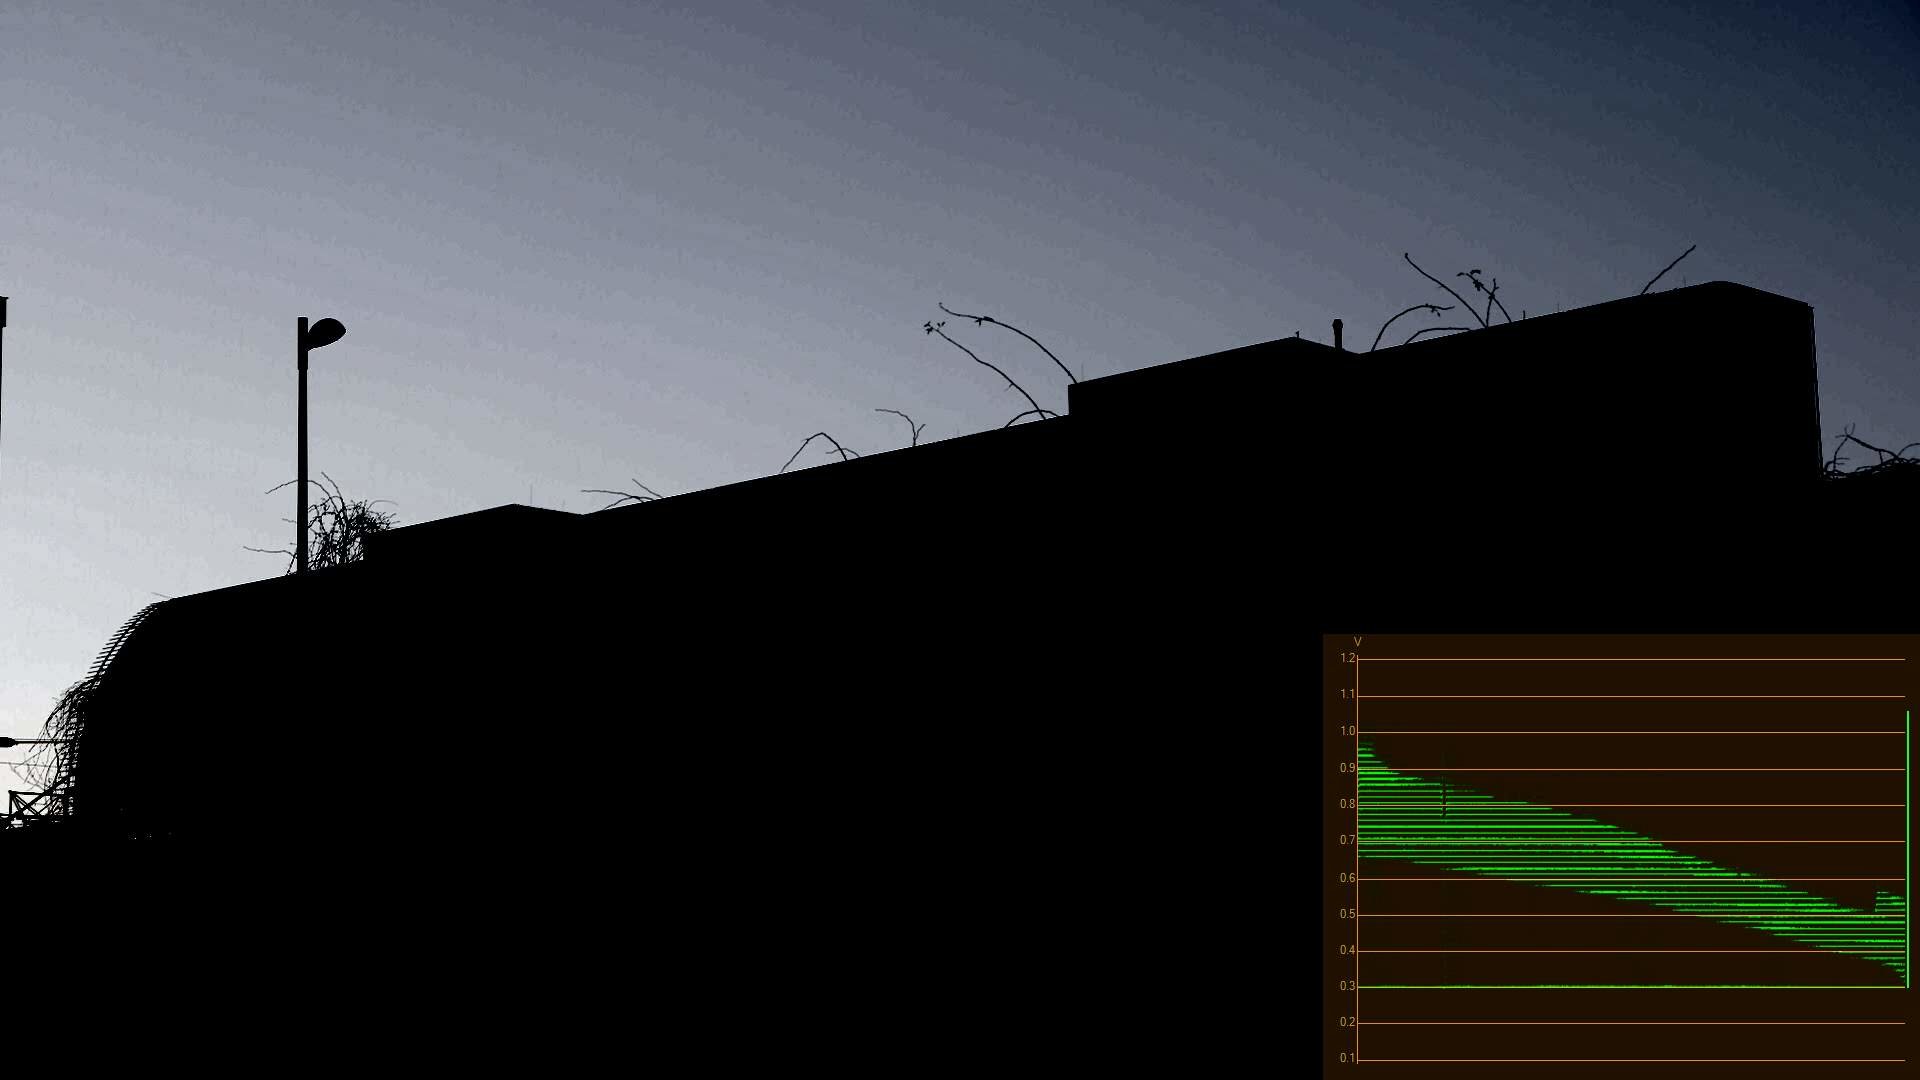
To get more into detail I’ve made a simple test.
I filmed a daylight scene with a nice wide white/blue sky and later watched the Waveformmonitor within Premiere CS6. What I saw prooved my theory again that you loose brightness steps when using the unmodified, original Canon C-Log.
I tweaked the Custom Picture settings in actually 2-ways that made a huge difference!
I turned on the Waveform-Monitor in my C100 and went into Custom Picture settings.
The most important thing is to setup a correct black-level and master-gain. There are two important settings for black-level adjustments:
for the C100 in the CP Menu under Fine Tuning:
Black -> Master Pedestal set to -2
Other Functions -> Setup Level -> Level -3
This basically sets a correct black level and master-gain for the Canon-Log Gamma curve. All other settings are left to default. The lowered gain value also limits the video-voltage to 1 volt – equal to 100% video level. Most important for broadcasting and it’s also a good thing for most nle’s because they dont handle video-levels over 100% very good. Many of them just clip them to 100%. The Level Parameter in the Custum Picture settings instead scales the maximum video-level to 100% and you dont loose details in bright areas!
UPDATE1: I finetuned the levels once more and create a CP named „CINE16“
The settings are as follows:
Gamma: Canon Log
Black > Master Pedestal: -11
White Balance: R=0, B=+1 (Depends on the camera – this is for the C100, the C300 has a bit more green in it and needs more white-balance tuning)
Other Functions > Setup Level > Level: +16 (If you want Superwhites, otherwise set to 0)
UPDATE2: While Cine16 uses Superwhites it’s proved to be not that solid as I thought it could be, instead use the c-log variant CinemaEX that I’ve created originally. Read my blog post about it.
My Cine16 as well as the original unmodified c-log uses the upper brightness range of the camera. The problem with that is, that image-noise is visible far earlier as in the modified CinemaEX where we actually shift the whole color-range down about 16 brightness steps. With this setup grading is far more easier because video levels are already set up correctly and I can focus on colors and contrast of my image when grading it.
Superwhites (Gain over 100%) have pros and cons. The advantage is to rise the dynamic range to the maximum within the exposure. You cram about 104-116% in the 8-bit range of the camera output (thats 256 brightness steps) and even can preserve some structures in highlights which would be overexposed otherwise. Superwhites are best when you filming outside in the sun with huge contrasts, sun, blue skies, deep shadows, then the Superwhites helps you capture the greatest brightness distribution.
Downside of Superwhites are that you have to know what you are doing, because when video-material is imported to NLEs, the Superwhites looks just overexposed and Superwhite-Details are clipped. Only when lowering the gain or the exposure gamma curve, or when graded within Grading Software (Speedgrade, Resolve) you can take advantage of the Superwhites.
So when not sure if you want Superwhites or not, it is better and easier to turn off Superwhites in your camera and lowering the gain.
A little setup help
Do this with your Zebra set to 100% and point your cam to something that is very bright and overexposed, then lowering the gain (Other Functions -> Setup Level -> Level) until the 100% zebra dissapears, then rise it again just one step. The 100% zebra should kick in and then you have a perfectly set up gain.
The black-level is a bit more tricky, but a good reference would be to go to somewhere really dark and watch the waveform monitor on your camera. Lower the black level (Black -> Master Pedestal) until the lower part of the waveform monitor is just before forming a horizontal line. When you turning the black to low, shadow details are beeing eaten up and crushed. Find a level that turns shadows as dark as possible, but without crushing shadow details – tick the number one or two steps up if you want a bit of black-insurance.
Just check out my comparision of the dynamic range of the Canon C100 vs the Canon 7D with raw image gainst the compressed AVCHD out of the C100.
The below test is made without the CINE16 CP which has Superwhites-Range.
Testing the extremes
Then I took the curve-filter in Premiere CS6 and scaled down the shadows until the darkest areas from the sky reaches 0.3 volt – the pure video black – 0/0/0 in RGB.

The extreme Gamma Curve which scales the brightness to a much smaller brightness range and narrows down the contrast of the sky to see how the Custom Pictures Styles holds up in grading.
When I did this with the filmed test material it shows more or less visible steps in the sky. Guess what, most steps I got with the modified Canon C-Log with stretched Gain and Black-Levels!
I got even more brightness steps and nicer colors out of the camera with a even more modified Custom Picture Style for which took the Cine2 Gamma, Norm1 Color Matrix, a Master Pedestal of +14 and Setup Level (Gain) set to -20 and a few other settings. I did a few more changes on that CP-Style which I called NTtc1 which you can download and tewak for yourself if you want or just use it as is.
![Nice and smooth brightness ranges with my Custom Picture Style NTtc1 even with extreme grading [On some Browsers the sky has visible brightness steps, because they show a web optimized image, please show on good quality LCD to see the images as intended!] (Click the image to see the full size image as png)](http://ntown.at/wpress/wp-content/uploads/CP_NTtc1.jpg)
Nice and smooth brightness ranges with my Custom Picture Style NTtc1 even with extreme grading
[On some Browsers the sky has visible brightness steps, because they show a web optimized image, please show on good quality LCD to see the images as intended!]
(Click the image to see the full size image as png)

The modified Canon C-Log Custum Picture Profile holds pretty well too with these extreme brightness corrections.
This is the unmodified original Canon C-Log Profile, banding in the sky is getting more visible and the waveform monitor showing more gaps.
The new WideDR Custom Picture Style shows the worst banding from these four CP’s.
Not surprisingly, I found out that the worst Gamma setting is the WideDynamicRange (Wide DR) and the EOS-Standard (EOS Std), which should emulate the dynamic range of a Canon DSLR with Standard Picture Profile, which is actually nor really reccomended to use, because it is way too contrasty. So best is to stay with Canon C-Log or Cine Gammas.
The benefit of tweaking the Canon C-Log Custom Picture Style is to get the whole 256 shades of R-G-B and that even helps the later grading, if you want, because you dont need that much of a grading, or just take it as is, because it is not that low-contrast mish-mush like the original Canon C-Log.
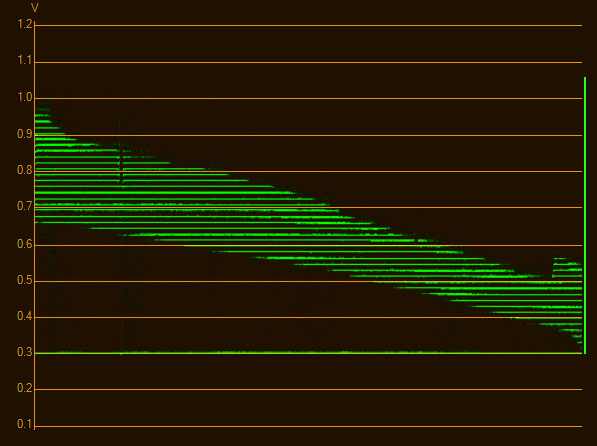
The image which produces this waveform has very visible banding effects.
When you try to grade certain imagery that is in a way limited in brightness steps (the color-bit-depth) the waveform monitor shows horizontal darker lines. These are brightness gaps which reveals banding much earlier when encoding the movie for heavier compressed material like the MP4/.h264 codec. The bad banding effects are mostly visible in smooth brightness transitions like skies and bigger areas in the image with no structures in it. Structures in the image by the way eliminate banding effects as a workaround.
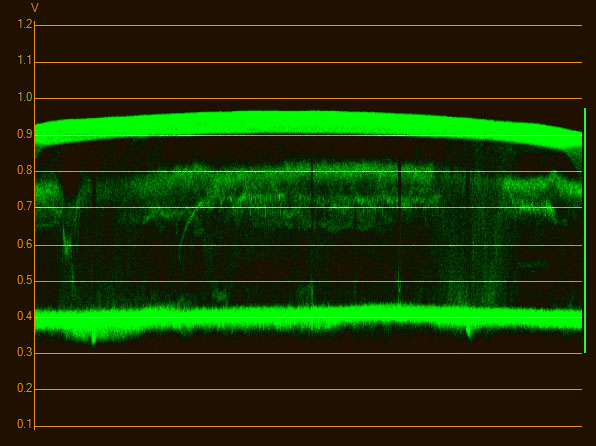
Waveform showing smooth brightness gradiations.
When the waveform monitor shows smooth transitions between the structures without horizontal darker gap lines, the image quality is fine and not „damaged“. When using material with higher bit-depths, the banding effects are not a problem because unlike 8-bit codecs with 256 brightness steps a 10-bit codec has 1024 brightness steps and a 12-bit codec has unbelivable 4096 brightness steps with which you have nearly endless grading possibilitis.
Try it out, test it and you will see that you can get out even better image quality for your C100/C300 and C500 when recording with the internal 50mbit 8-bit codec from the C300 or even with the 24mbit AVCHD Codec from the C100 😉
NTown Custom Picture Styles Downloads
The Custom Picture Styles for the C100, if you want to use them on the C300 or C500 just use the text-description below and set the parameters manually or include them into your camera-settings file and import it into the camera.
UPDATE January 2014: Read about new versions of my Custom Picture Styles.
UPDATE March 2014: Read more about the latest version of the c-log alternative.
Custom Picture NTclog1 : simply the Canon C-Log Gamma Curve and the Canon-Log Color Matrix but with corrected Gain and Black-Level from 0 to 100%
Custom Picture NTtc1 : my former favorite, its a combination of Cine2 Gamma-Curve and Norm1 Color Matrix, again with corrected Gain and Black-Level to 0-100% and pretty vivid colors.
Custom Picture NTtc2a : my favorite at the moment, Cine2 Gamma-Curve and Cine2 Color Matrix, corrected Gain and Black-Levels and some color matrix modifications to create a better cinematic film look.
NEW: Custom Picture NTtc2b : Cine2 Gamma-Curve and Cine2 Color Matrix, corrected Gain and Black-Levels and some color matrix modifications to create a better cinematic film look (improved version of NTtc2a).
WARNING! BE CAREFULL WHEN USING ON A PRODUCTION. TRY IT OUT AND TEST FIRST BEFORE USING THE CP-STYLES FOR PRODUCTION!
	USAGE:

	Just copy the files on a SD Card in the directory structure:

	PRIVATEC_PICT

	and import them via Custom Picture Menu:

	Transfer File -> Load from SD -> (A or B)

	or just set the CP directly from the SD-Card.
Custom Picture Styles Settings
The Custom Picture parameters as textual information for manual tuning
NEW: NTtc2b Custom Picture Style
| Subscribe to our Newsletter and get a special discount for our Webshop and a LUT Gift Package! |


Related Posts on NTown's Blog
 NTCLOGc – Alternative c-log Custom Picture Style for Canon C100/C300
 Canon Cinema EOS C100/C300 Custom Picture Styles
 Canon C100/C300 Custom Picture Profile Noise Comparison
 List of most popular Canon, Sony, Panasonic camera Base LUTs
 NTownFilmFlat Custom Picture Style for Canon DSLR
 TUTORIAL: Canon Picture Style Editor
 Canon EOS-C100 Tips Collection

 English
Hi Patrick
I tried to install Custom Picture NTtc2a didn’t work
I followed your instructions
USAGE:
Just copy the files on a SD Card in the directory structure:
PRIVATEC_PICT
and import them via Custom Picture Menu:
Transfer File -> Load from SD -> (A or B)
or just set the CP directly from the SD-Card.
There was no C_PICT directory in my SD card just PRIVATEAVCHD … so I created one folder there and dropped the files I downloaded.. not working
when I try to load the CP from the SD the A and B are Grayed out so I cant select none
when I try to Set the CP directly from the SD-Card I can select the A card but the camera and menus freeze and I get stuck there =(
Try to format the SD card in the camera and then just save one picture profile to the SD card.
If that works, plug the sdcard to you computer and copy the cp-file to the sdcard next to the cp-file you saved but rename it to be the next number in row from your existing cp-file.
Hope this helps 😉
Patrick.
Hi Patrick, Thanks for your work on cine log. You say you used the waveform monitor in CS6. OK, my question is: „Did you use the camera waveform monitor while shooting?“
When using the logmodes (like WDR) you should respect their bandwidths. Did you? ; )
Hi Richard,
It is always a good idea to use the waveform monitior and zebras on the camera, especially when outside because the monitor from the C100 can fool you for the correct exposure.
Unfortunately the WDR CP is the worst when it comes to banding. You wont see ist when you just film and edit the material, but when you start to grade you will hit limits pretty fast. You get a little more „room“ when you modify the CP-Styles propper.
Thanks for commenting 🙂
In your grading tests, did you activate Premiere Pro’s 32bit maximum bit depth in the sequence settings?
No Robert, the „Maximum Bit Depth“ option was not set in this test because I used the Ninja2 with ProRes codec which only supports 8-bit in Windows Premiere and it makes no difference with the option enabled or disabled. Later when I found out that DNxHD 220x 10-bit is supported and shown as 10-bit in Premiere it makes perfect sense when enabling the „Maximum Bit Depth Option“ to preview smoother gradinents in the Premiere Preview window. On the other hand, the enabled render option „Maximum Bit Depth“ in Media Ecoder uses a higher bit-depth regardless of the same Sequence-Setting option, but also makes only sense if you use an appropriate render-codec which of course supports higher bith-depths.