
Building a 4K Video Editing Workstation for 2016 – Part #2
Category : Workflow

The creation of a 4K Video Editing Workstation
This article gives an overview how to build a decent video editing workstation capable of editing resolutions of at least 4K in full resolution based on Win7/10 for a price of apx. $3000 without a monitor.
In the previous article, I said goodby to my old video editing workstation by benchmarking it how good it was with 4K editing.
The Idea of 4K Editing without Proxy
I’ve using Premiere for a very long time now and kind of grown to it. It’s not perfect but the recent version are getting better and better. The last few years I used a Canon C100 with a Atomos Ninja 2 and later a Ninja Blade for my projects.
The recording format for the Ninjas is either ProRes or DNxHD, I rarely used the Canon C100’s AVCHD Codec. So I editited mostly DNxHD and occasionally ProRes on my Windows 7 driven Premiere CS6 and later Premiere CC, so proxy editing was never an option or necessity.
Until now everything was fast and fine with my late workstation, but recently I added a Canon C300 Mark II and a Canon XC10 to the machinepark of my productions. That changed everything.
4K editing was now and I spent my old workstation a small upgrade, but it help only little to gain proxy-less full resolution 4K editing of my projects which are now featuring not only DNxHD material but also 4K XF-AVC from my Canon C300 Mark II and the Canon XC10, which is also very capable of recording internal 300mbit 4K 4:2:2 material.
So the goal was to build a new 4K editing and graphics workstation which is capable of full resulution 4k playback without the use of proxy files. I want to see my 4K material in full glory on a big 4k screen, if possible in 10-bit. Clients will love you for that!
The Priority of Hardware Components
When you want to work or even build a computer based on Windows you must be a Advanced Power User. This is nothing for beginners or people how wants just edit videos and do not want to care about hardware.
The benefit of a Windows computer compared to Apple is a more flexible, customizable, more powerfull workstationn exactly for your needs which is also cost effective which is a important argument if you are a student or even a company which needs more than one workstation.
1. CPU – The most important component in a decent workstation, especially when using it for video editing.
Choosing the right or wrong cpu can make or break 4k video playback, in our case Premiere CC. Every cpu has it’s purpose and there are many a user can choose from.
The cpu of my choice for the 4k video editing workstation ist the Intel i7-5930K with 6x 3.5GHz and 3.7GHz Turbo core, which can be overclocked with standard air cooling to about 4.4GHz. Second choice can be a Intel i7-6700K, which has onyl 4 cores but a much higher performance per core.
Pros for the 5930K: 40 PCI lanes, max. 128GB adressable RAM, Quad Channel RAM Controller
Cons: higher price, lower single core performance
Pros for the 6700K: lower price, integrated GPU which helps decoding & encoding videos, higher single core performance, better power consumption efficiency
Cons: slightly lower cpu performance, only Dual Channel RAM Controller, only 18 PCI lanes, max. 64GB RAM
Booth CPUs, the 6700K and the 5930K are good for 4k video editing performance.
On a sidenote, there are also XEON cpus which do have 12 or more cores but are much more expensive, but also deliver even higher performance.
And there are still AMD cpus, but the only choice here would be a Opteron CPU with at least 12 cores to facilitate a comparable speed and there are not that many mainboards to choose from, actually only Asus or Supermicro.
The test-sequence used in Premiere CC with different file formats to show how they use the hardware.
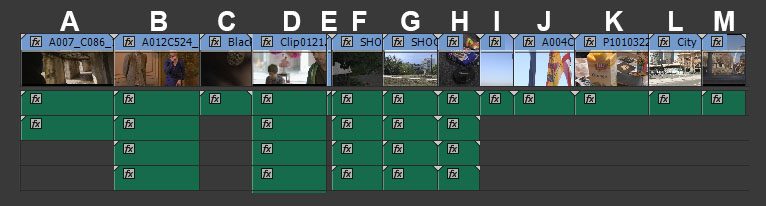
See letters for clip reference in benchmark charts
The Benchmark Sequence clips are from these cameras:
A: Red ScarletX (4096×2160), B: Canon C300 MkII (3840×2160), C: BMPC 4K – ProRes MOV (3840×2160), D: Sony F55 (4096×2160), E: Canon 1DC (4096×216), F: Canon CX10 – Shogun – Avid DNxHR (3840×2160), G: Canon XC10 – Shogun – ProRes 4K (3840×2160), H: Canon XC10 – Shogun – ProRes 4K (3840×2160), I: Canon XC10 4K MXF (3840×2160), J: Canon XC10 4K MXF (3840×2160), K: Panasonic GH4 4K (3840×2160), L: BMPC 4K – ProRes MOV (3840×2160), M: Canon 1DC 4K (4096×2160)
 CPU and RAM usage while playback with PP 2015.2 |
 CPU and RAM usage while playback with PP 2015.3 |
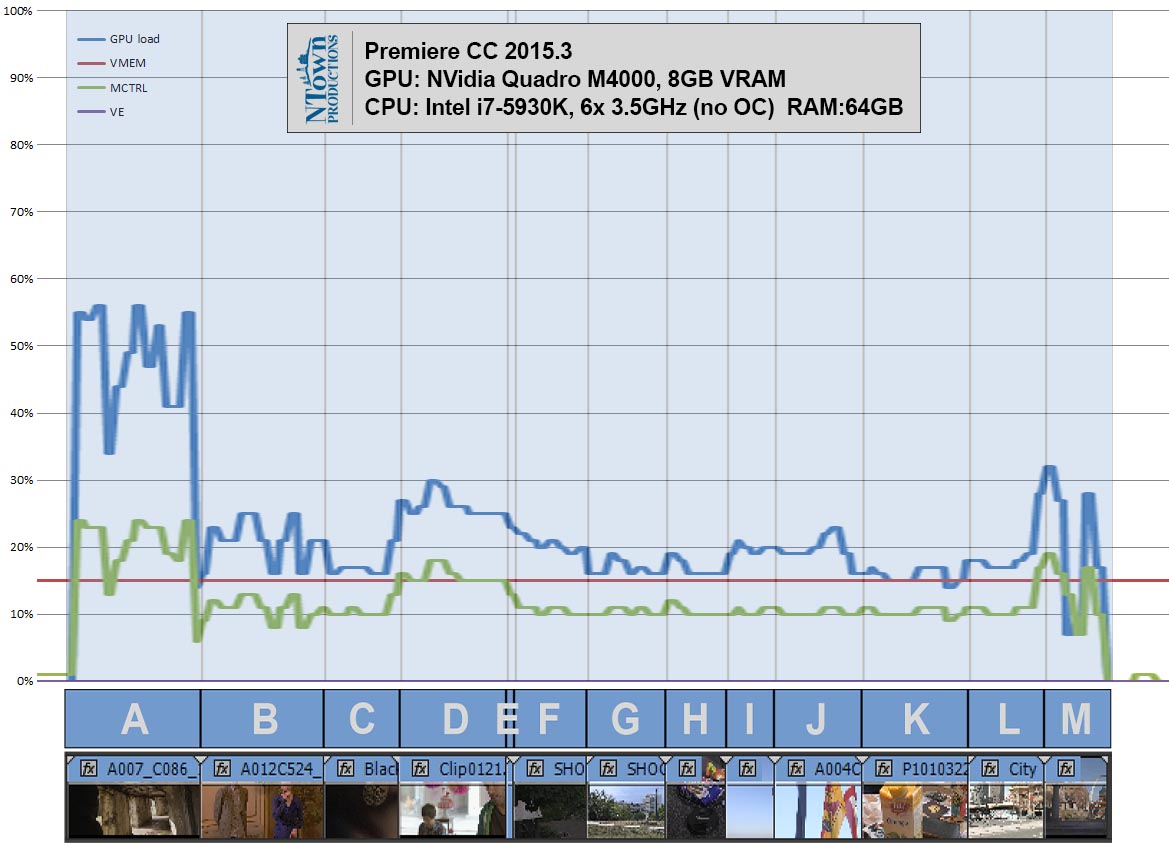
GPU performance of the Quadro M4000
2. RAM – Second important component is undeniable System RAM, lots of it. Think of absolute minimum 32GB, getter go with 64GB when planing to edit 4k material and to be a bit future proof. RAM speed should be above 2133 MHz and buy two or four RAM-modules of the same kind.
I’ve choosen a Corsair Vengeance LPX DDR4-3200 64GB Kit with four modules, each 16GB capacity which are playing nice with an overclocked i7-5930K.
UPDATE: Recent version of Premiere CC 2015.3 fixed a memory leak problem and it seems that 32GB RAM is enough even for 4K editing.
3. GPU – Third important component is the GPU. There are two ways you can go: 8-bit or 10-bit output.
If you don’t need 10-bit output then you can choose any GTX above the 780Ti with a minimum of 4GB VRAM. When you plan to output your video preview to 10-bit display go for a AMD FirePro W8100 or a NVidia Quadro K4200, M4000 or higher. AMD do have a bit more performance, but bad drivers.
I tested the AMD FirePro W8100, NVidia Quadro K4200 and the Quadro M4000. More about the GPU later.
READ MY EXTRA SUMMARY ARTICLE: OPTIMIZED 4K PLAYBACK SETTINGS IN PREMIERE PRO CC
4. Motherboard – The above components define the path for the mainboard selection. If you go for an 6700K you need the newer Intel socket 1151, when choosing a i7-5930K or similar and plan to upgrade the cpu in a few years or want to upgrade RAM to 128GB you need to choose a mainboard for socket 2011-3 which are also able to take XEON cpus if you want to go that road.
Choose you mainboard wisely, there are many different out there. As mentioned bevore, the CPU and RAM should be compatible with the mainboard. The GPU will fit, pretty certain.
I’ve choosen a Asus X99-Pro board, the USB 3.1 variant. It gives me a good balance between onboard features & price. It takes a maximum of 64GB with a Intel I7 cpu and 128GB with a XEON cpu and takes DDR4-3300 clocked ram and also features SATA-Express with and M.2 connections. Thunderbolt-2 is optionally via onboard connector and a €70 breakout box. And it features Bluetooth and WiFi wireless radios on board.
With an Asus board you get the AI Suite 3 which is excelent for overclocking and controlling the whole mainboard, including CPU, RAM, Fans and many more. But more of it below in the Software & Tools section.
5. PSU – where the electrical power comes from. And it’s underrated how important a good PSU is. I’ve choosen a Enermax Platimax 850W which powerfull and serves stable voltages for the components in the workstation. If the PSU is rated to small your system gets unstable, the cpu throttles down, components gets wrong voltages or even gets destroyed.
6. CPU Cooler – The Scythe Mugen 4 was the choice for the CPU I installed on the mainboard. The cooler can throttle down fan to zero rpm if the cpu temperature is low enough to achieve even silent cooling. When overclocking the cpu, the cooler provides good cooling with it’s 6 heatpipes going from the cpu up to the tower where the very thin cooling fins spreading the heat. A good cooler is very important because if you CPU is overheating it can throttle down the frequency in order to protect itself and you’re loosing processing power and this can happen very fast if you live in a hotter area.
7. SSD & HDD – The least important component are the System Storage Disk, which can be a SSD for faster loading and the data HDDs for your projects.
Do not missunderstand me here, I did not say that harddisks and storage are not important, no they are important, but they are the least important in a system. Normally you can edit 4K projects from a normal 5400rpm HDD if it has at least 80-100MB/s sequential transfer speed. It strongly depends on your projects and how many layers of video should be played in realtime.
The only need for a faster RAID is when you plan to edit many layers of video, like a Multicam project. It depends on the material used, but you can calculate max movie BITRATE multiplied by # of LAYERS multiplied by 2 (for safety) divided by 8. For example if you have lots of Canon C300 MkII 4K clips with 405mbit and have about 3 layers simultaneously than you calculate 405*3*2/8 equals apx. 303 MegaBytes/s, which should match your harddisk’s minimum speed. This speed is normaly achieved by a onboard RAID-0 with two WD-Black HDDs or better.
If your material is coming from a Panasonic GH4 or a Sony A7SII or alike with a 100mbit 4K codec, than you can even edit from a better USB HDD.
Conclusion for HDDs: use a 128GB or 256GB SSD like a Sandisk Extreme Pro for the system and applications and a RAID-0 with two 3TB or 4TB HDDs like a Western Digital Black as internal Project Raid with a performance of apx. 300MB/s.
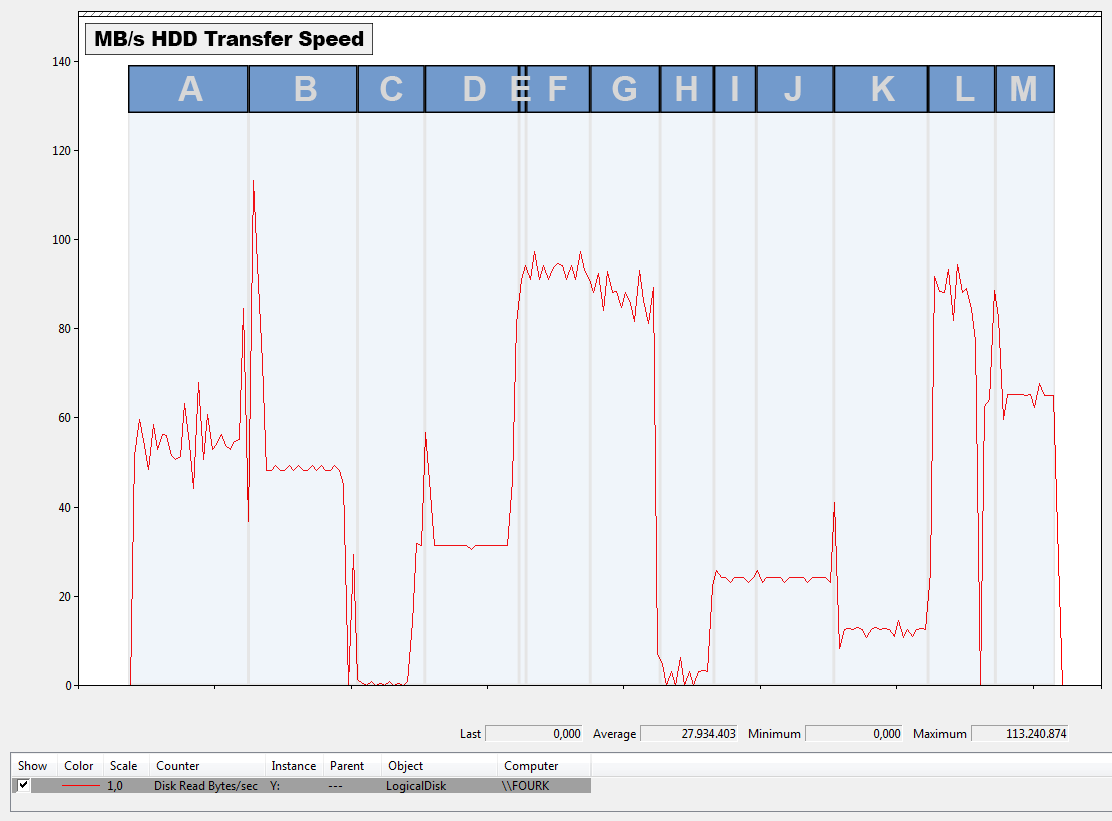 HDD transfer speeds while playing different clips |
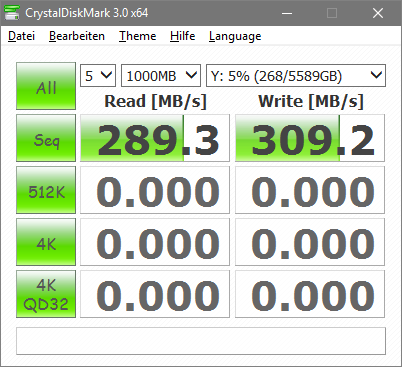 WD Black 3TB RAID-0 Benchmarks |
8. The Workstation Display – Either you want to go the 10-bit route or not, a good quality Monitor is worth half the workstations quality. I’ve choosen a HP Dreamcolor Z27x, which is a very special display designed together with the Dreamworks SKG, in order for cinematographers to have a cinema display that looks exactly like the finished movie on the bigscreen and for special visual effects people alike to have a display that just looks right for cinema productions.
The display has several color spaces to choose from, like sRGB, AdobeRGB, BT.2020, DCI P3 and BT.709 which makes it easy to get the colors and brightness right when color grading your movie. A nice feature is that the Dreamcolor display features framerates of 24p, 30p, 60p and even interlace modes like 50i and 59.95i and much more. The display is available in three sizes and different resolutions from FullHD up to UHD 3840×2160 which makes them perfect editing cinema displays and the displays can be automatically calibrated with an external calibrator.
9. Other Hardware for the Workstation
- ShuttlePro v2 (jog-shuttle wheel & customizable control buttons)
- HP Dreamcolor Calibration System (based on a customized X-Rite i1)
- Sharkoon 5-bay eSATA/USB3 hotswap HDD box
GPU and 10-bit Video-Out Solutions
There are two ways of going out to a 10-bit display on MS-Windows, asuming you have a dispay which is able to show 10-bit colors.
First way is through a extra PCI-Express card like the Blackmagic Decklink line which gives you 10-bit via SDI out to a 10-bit video monitor with SDI-in or the second way via professional graphics card.
There are again two main choices for professional graphics cards: NVidia Quadro or AMD FirePro. To make the introduction short, Quadros have better drivers but are much more expensive and slower on paper. AMD Hardware is nice, but the Quadro M4000 with also 8GB VRAM is the best choice in the price segment of around €900-1200.
After testing the AMD FirePro W8100 I’ve chosen a NVidia Quadro M4000 with 8GB VRAM which cost about €200-300 less than the FirePro. The display I’ve chosen is the HP Dreamcolor Z27x with a resolution of 2560×1440 for editing and for displaying full size 4k the bigger version Z32x which features a resolution of 3840×2160, booth display 10-bit and are able to show refresh rates at 24Hz, 30Hz, 50Hz, 60Hz among others, perfect for video editing!
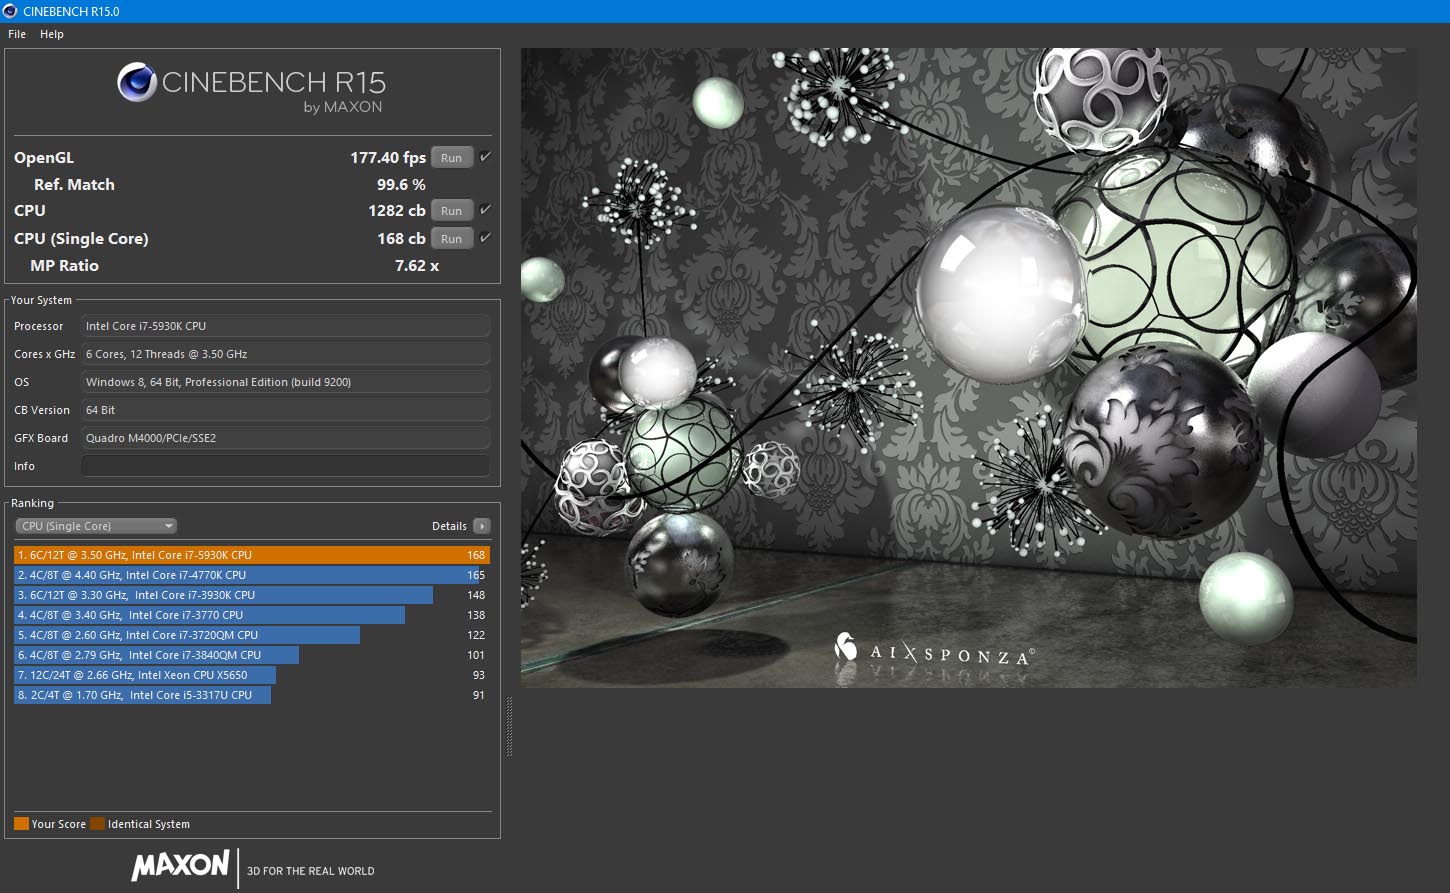 Cinebench v15 Single-Core performance |
 Cinebench v15 Multi-Core performance |
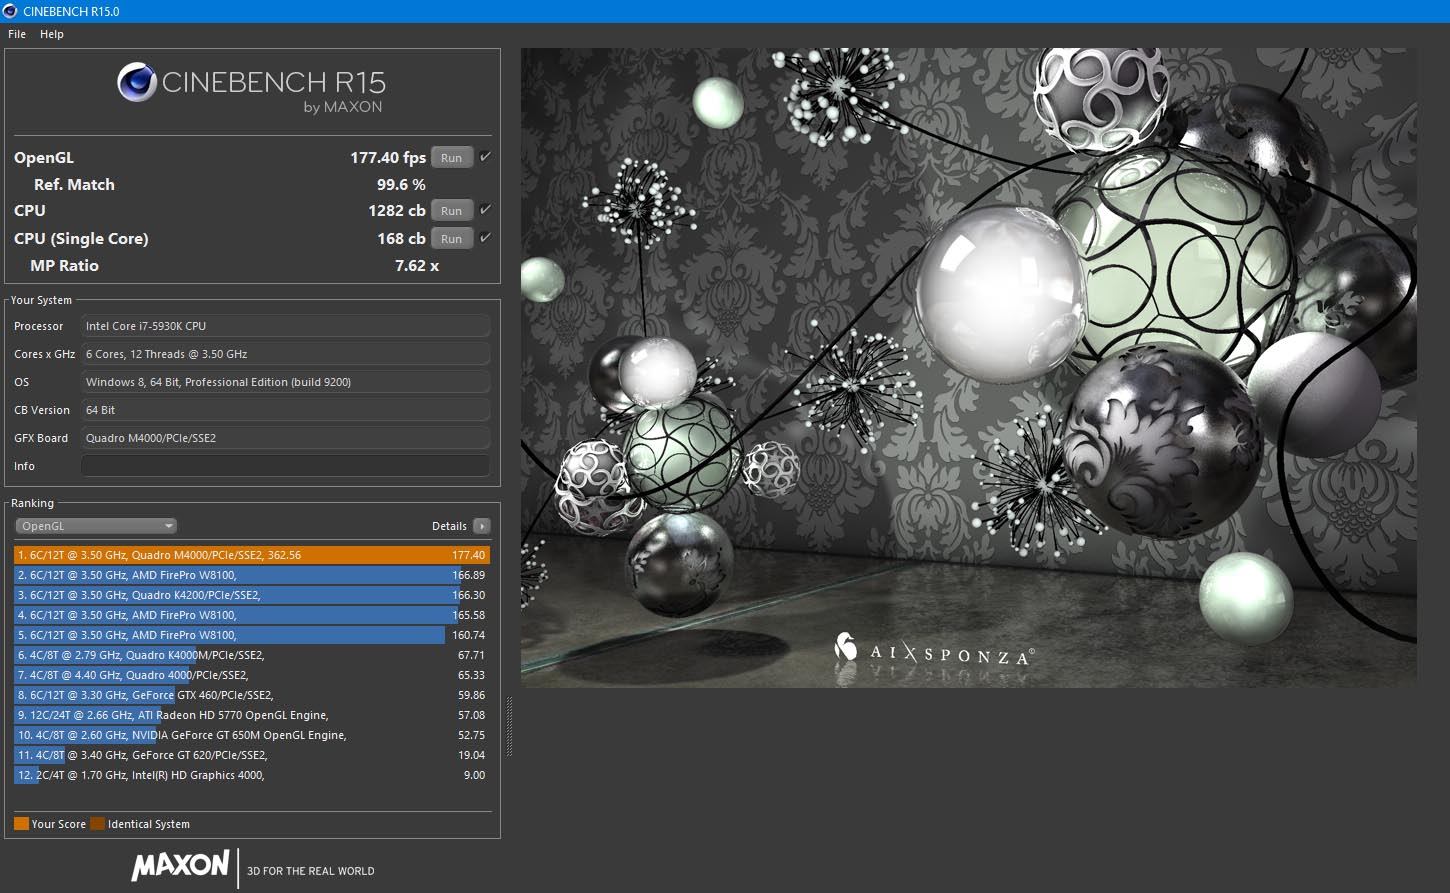 Cinebench v15 GPU performance |
The main reason why I went with NVidia and not with AMD is that 10-bit in Premiere CC 2015 was not working with the FirePro, the images are just black and the beta drivers are not better either. Heat was also a bit of a problem, despite the double slot solution and a rear heat exhaust, the AMD FirePro is producing to much heat for my taste. Otherwise the FirePro is surely a very nice performing professional graphics card but mainly for 3D and graphics applications. NVidia is the way to go with video editing, fast and working great in 10-bit.
Speaking of 10-bit, the applications displaying it correctly with the Quadro M4000 are Premiere CC 2015.2, Photoshop CC, Lightroom CC, After Effects CC, MediaPlayerClassic HomeCinema and many more.
The very versatile movie player MediaPlayerClassic-HomeCinema is also playing 10-bit movies AND is showing images in 10-bit like TIFFs in very nice quality – who would have thought it that a movieplay is showing 16-bit tif images in 10-bit 🙂 !
Software & Helper Tools
Core Parking Utility
Utility to enable or disable Intel (and AMD) CPU core parking feature which can fix the problems which the Adobe Media Encoder facilitating not all cores when encoding movies with a Intel CPU.
DOWNLOAD Core Parking Utility (Win7/8/10) or download it at coderbag.com
Asus AI Suite 3
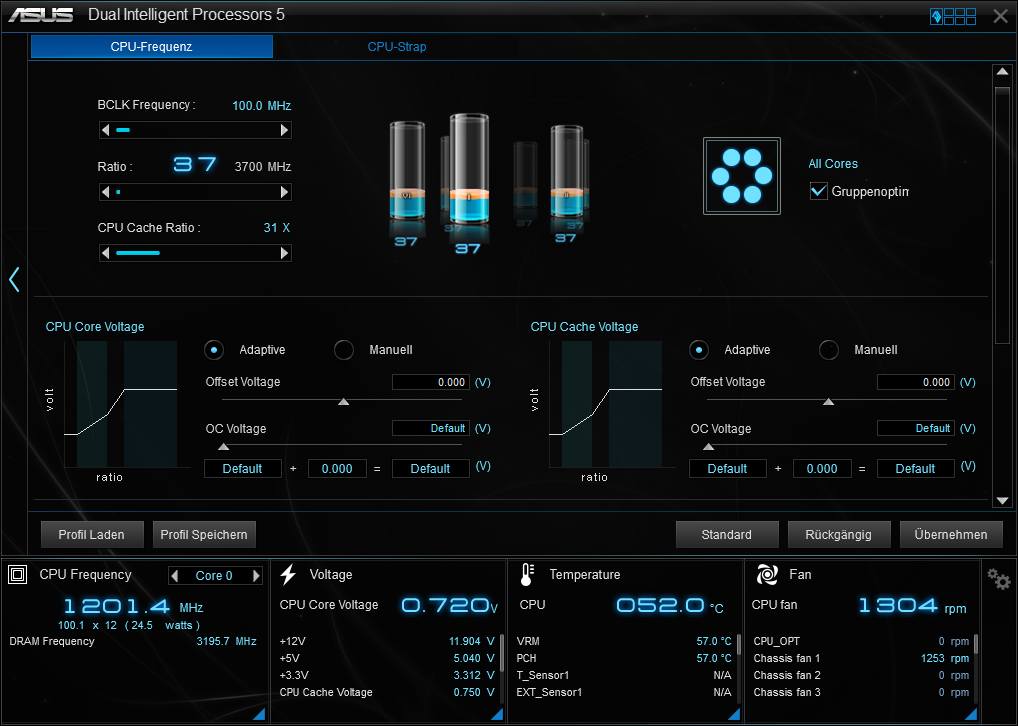
AI Suite 3 controls cpu clocks, ram clocks, fans, …
A Utility for Asus Mainboars that helps overclocking the cpu very save and efficient, also for controlling all fans in the computer case via user adjustable temperatur curves.
If you want to overclock you cpu, no problem, it’s as easy as pressing a button and go. Asus’ AI Suite tests your system stability and measures in fans and how controlable they are, then checking your cpu and overclocks it automatically via multiplierer until the system gets unstable and reboots. After that AI Suite gives you a save Clock-Rate which is working with your hardware combination (cpu, cpu-cooler, mainboard & ram).
If’ve got my i7-5930K overclock from stock frequency 3.5 GHz to 4.4 GHz, which enables the machine editing Red material in 4K in full resolution, realtime, without dropframes.
DOWNLOAD Asus AI Suite v3 (Win7/8/10) or at the Asus Utility Download Page.
MSI Afterburner
Better gpu fan control for the NVidia Quadro M4000. Get it from …
Sapphire TRIX Utility
(obsolete, because NVidia Quadro is the gpu to go)
This software is for AMD GPU users, it is actually made for Radeon cards, but also works great with the professional FirePro line.
Trix allows the user to control the gpu frequency, v-ram frequency and the gpu-fan via a user adjustable temperature curve. It is good to know that the fan only kicks in when it’s needed and goes for full speed if the gpu is working hard.
DOWNLOAD Sapphire TRIX Utility (Win7/8/10)
Software used for monitoring & benchmarking:
Logging function from the Windows Gadgets (available for free at Softpedia):
- System Monitor II Windows Gadget
- GPU Monitor Windows Gadget
- 8gadgetpack (Windows 7 Gadgets for Windows 10)
HDD performance was benchmarked with Windows own System Performance Monitor which measures the actual throughput from a certain HDD.
Special Movie Format Facts
While any other 4k movie codec format is playing fine, the Red’s Redcode movie codec plays a special role.
A movie editor who wants to work with movies filmed with a Red cinema camera would usually plug in a RedRocket extension card in the editing computer in order to be able edit RedCode material.
The RedCode expansion card alone pays for $4700 and if you want 4K output to a external monitor you have to additionally invest $1200 for a Red breakout box.
Redcode movie files are pretty demanding on the hardware, but the great thing is that they feature to be a Wavelet codec.
Normally movie codecs needs to be decodec as whole. A Wavelet codec is decodec in steps, like a progressive PNG and Adobe Premiere supports this stepwise decoding RedCode movie pretty great.
Now how does the hardware mentioned in this article play RedCode movies?
Well, if a RedCode movie isn’t playing in realtime, just set the playback resolution to half or even lower and performance is back. This is possible because RedCode or Cineform codecs are Wavelet codecs. Simple explanation is: the movie is stored in different resolution from low resolution to high-res within one moviefile. For a more detailed explanation jump over to Wikipedia.
So when using a 4K external display for editing via Mercury Transmit using RedCode material in 6K, set Playback Resolution to half and basically playing a 3k resolution movie on a 4K monitor still looks great as a “preview” resolution.
On my workstation 4K RedCode movies are playing fine in realtime, 6K movies are playing fine with playback resolution lowered to half WITHOUT a RedRocket extension Card!
Red’s RedCode movie format is mostly stressing the CPU and if you upgrade the processor to a even stronger, like a Intel i7-5960X, you can even playback full resolution 6K RedCode movies in realtime with full playback resolution in Premiere Pro – all without a expensive RedCode extension card and breakout box, that only plays movie files from a Mysterium Sensor, for Dragon recorded movie you need the $6700 RedRocket-X. But that is a different story.
Additional Software for the Workstation
- Acronis TrueImage (backup software)
- Magellan Explorer (file manager)
- Hard Disk Sentinel (S.M.A.R.T. HDD/SSD health monitoring tool)
| Subscribe to our Newsletter and get a special discount for our Webshop and a LUT Gift Package! |


Related Posts on NTown's Blog
 Building a 4K Video Editing Workstation for 2016 – Part #1
 NTown’s Shop OPENING!
 Premiere Pro CC: Optimized 4K Playback Settings
 Adobe Premiere CS6 & Encore CS6 Download Links
 Canon C100 + Atomos Ninja2 10-bit Workflow
 WORKAROUND – How to repair DNxHD codec Video Levels
 c-log2linear – Premiere Pro & Speedgrade effects preset

 Deutsch
You must log in to post a comment.
This site uses User Verification plugin to reduce spam. See how your comment data is processed.