TUTORIAL: Canon Picture Style Editor
How to use the Technicolor CineStyle with Premiere Pro CS5
First step is to install the Canon Picture Style Editor either from your DSLRs CD or from Canon’s WebPage – if you download the software you will need to insert the Canon Utilities CD anyways.
Get the Picture Style Editor from Canon Utilities Support Site.
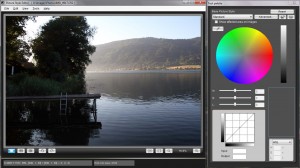
When you start the PSE (Picture Style Editor) you will find an empty window.
To create a new Picture Style you need a RAW photo – other formats are not accepted (except some tif format which I not managed to get it in PSE no matter what color-depth).
Just drag’n’drop or open it via file-menu. When the image is loaded PSE probably warns you that the photo is shot with a different picture style, PSE will reset the image to the Standard Picture Style.
In the VIEW menu check the Tool Palette if the window is not visible.
Setup and Adjustments
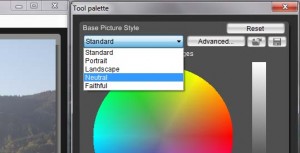
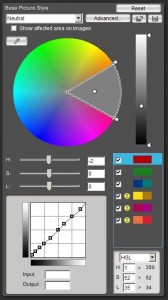
When your create a new Picture Style, the Base Picture Style in PSE is set to Standard. You can change the Base Style in the dropdown-menu. For a neutral base-setup change it to Neutral.
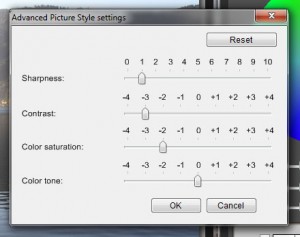
To change the Sharpness/Contrast/Color/Tone Settings click on the Advanced Button.
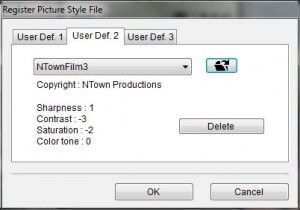
Good starting values are Sharpness: 1, Contrast: -3, Color Saturation: -2, Color Tone: 0
When done click OK.
With that adjustments you basically already have new Picture Style which you can save to disk with the little Floppy Symbol to the right or just in the File-Menu.
The description how to transfer the new Picture Style via USB to the Camera follows below.
Advanced Gamma Curve and Color Tweaks
|
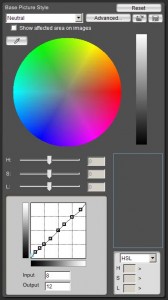
When you try to achieve an image were the shadow details are important and want to get more out of your highlights then PSE gives you the possibilities to create your own Gamma-Curve and even Color-Mappings for your resulting image!The Curve represents the mapping of distribution of the image luminance. Adding a point in the bottom left area and lifting it a litte upwards will bring more shadow details, on the top right area of the curve you can modify the highlight behavior. When adding a point und lowering it a bit (numeric apx. Input:232 Output:224) the highlights will be preserved a lot better!To add a point to the curve click on it. |
|
You can modify the curve when draging the point around or you type the values directly in the Input and Output text boxes.To delete points just click tem and hit delete on the keyboard. After adjusting the parameters as you like, save the Picture Style with a new and description. |
Saving the Picture Style to the Camera
- Turn your EOS Camera to PHOTO MODE NOT to Movie Mode to be sure – some Cameras wont transfer the Picture Style correct if the camera is in Movie Mode!
- Turn off your EOS Camera
- Connect the Camera via USB cable with your computer, turn it on and wait until the computer has accepted the device
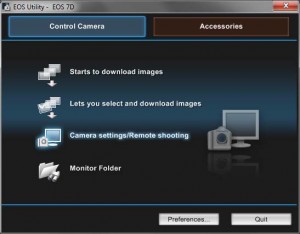
Now you can start the Canon EOS Utility. You will find it on your cameras install CD or online (see at top).
Click on Camera Settings / Remote Shooting.
|
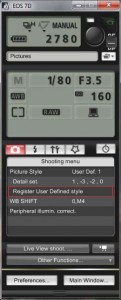
You will now see a new window with settings similar to your cameras LCD display. This is were you can remote control your camera, even shot time-lapses directly to a laptop without saving to the Compact-Flash card and even more! In the Shooting Menu click on Register User Defined style to add you newly created Picture Style.You have the choice of three slots (the three tabs) for three User Picture Styles in addition to the built in Picture Styles already in the Camera. You can exit the EOS Utility and turn off your camera, then unplug it. |
Set your Picture Style in the Camera
Turn on your camera and switch it to movie mode.
Go to Picture Styles and choose your uploadet Picture Style – press OK and your’re set!
Don’t forget to turn of your camera’s Timeout-Function to ZERO or the cam will turn off every few anoying minutes!
Also as a reminder: Turn to MANUAL (M), keep shutter at 1/50 and use Fader-NDs to keep it that low and your Iris open for shallow depth of field!
IMPORTANT! The Sensors tend to overheat so keep the camera cool, under an umbrella to avoid direct sunlight and a fast heat-up of the body!
Any comments, questions and suggestions always welcome!
| Subscribe to our Newsletter and get a special discount for our Webshop and a LUT Gift Package! |












 Deutsch