
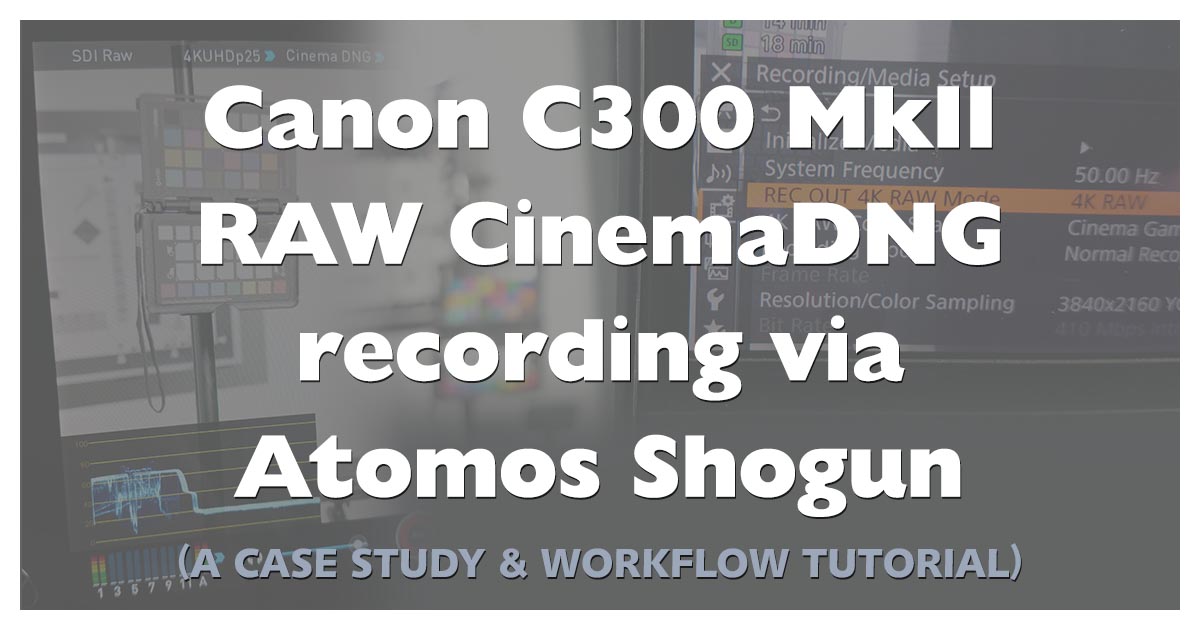
Atomos Shogun CinemaDNG RAW via Canon C300 Mark II Review
Category : Reviews

Atomos Shogun CinemaDNG RAW via Canon C300 Mark II Review
Recently Atomos released a new Firmware for some of their external recorders which enables them to finaly record CinemaDNG from a cameras RAW output. We took a closer look how it works and what quality is to expect.
The Hardware and Setup
Our setup consists of a Canon C300 Mark II with a Sigma 18-35mm f1.8 lens and a Atomos Shugun with SanDisk Extreme Pro 480GB as recording media. The SanDisk Ultra II gave me dropouts while recoring which results in many cut-up folders with the CDNG frames inside.
The camera’s resolution is set to UHD 3840×2160 25p and 4K raw output, with the color Gamut set to Cinema (Can be set to Cinema or BT-2020 when outputing RAW).
The Shogun recorder with the latest v6.7 firmware installed, is set to CinemaDNG recording format.
The tests are recorded simultanously on booth, the camera internal as XF-AVC 10-bit 4:2:2 and external on the Shogun as CinemaDNG via raw output from the Canon C300 Mark II.
When you look at the image on the Shogun, it looks like either c-log2 or c-log3 on the screen (depending what you set on the C300MkII), but the recorded CinemaDNG images are much darker – like half the luminace.
The recorded CinemaDNG image sequence is the pure sensor readout from the camera without much processing like gammas, noise reduction, color matrix or gamut settings, which is very nice and delivers a very pure image.
I’ve provided a LUT below that corrects only the luminace of the image to a BASE-look very similar to c-log2, while preserving all shadow and highlight details.
Software and Postproduction Workflow
Debayering / processing was done directly with the latest Adobe Premiere CC 2017 and Adobe Speedgrade CC 2015.2 (get my Premiere project file converter here) powered with a NVidia Quadro M4000 on Windows 10.
Realtime playback of the 4K CinemaDNG file sequences is very hardware demanding, even on a high powered machine, but it helps when reducing Playback Resolution to 1/2 or 1/4 and turn off High Quality Playback in Premiere. In 4k UHD with 3840×2160 pixels resolution every single frame is a bit over 10MB, so consider a lot of storage and a fast harddisk or RAID with at least 300MB/s transfer speed when recording CinemaDNG.
A intermediate format like Cineform should get a equally good movie format which is also able to play back in realtime on a decent editing machine – or you switch over to a proxy workflow.
After recording, which went fine and without dropouts on the Shogun, the first workflow drawback came up. The file naming for the CinemaDNG file sequences. Recorded sequences are recorded in folders named like “SHOGUN_S001_S001_T001” with two folders inside.
“AUDIO” contains the wav file with the same name as the scene folder and “IMAGE” contains the CinemaDNG image sequence.
This is where the first problem comes up. All image sequences are named like “FRM_000001.DNG”, with no scene name in the file name. When importing to Adobe Premiere, you got plenty of sequences with same names – a horrible mess.
UPDATE: I’ve created ASSrenamer, which automatically renames the “FRM_” file sequences to the corresponding scene & take names from their parent folder. Available at our NTown WebShop!
Adobe Premiere Image Sequence Importing Workflow
A) Now every file sequence could be renamed to the propper scene name like it’s folder by hand, which is a absolute no-go.
B) Another workaround is to invoke the import command via menu or shortcut key CTRL+i or ⌘+i, navigate to the scene folders where all the CDNG sequences are and type into the search field “FRM_000000.DNG”. That will list the first frame of all sequences in the folders. When selecting them, Premiere automatically imports them as file sequences. But that does not solve the file naming problem. The sequences are still named all “FRM_…”. UPDATE: ASSrenamer can be used to rename sequences and then use “_FRM_000000.DNG” as search term while importing sequences.
C) So the only suitable solution for now is to rename the file sequences with a file rename tool to the propper scene names and use method B) to import multiple sequences. I will write a rename tool for Windows which automates this step for a more convienient workflow and release it soon.
Image Quality
This was the biggest question coming up when Atomos first announced raw recording from a Canon C300 MkII on it’s Shogun recorder over a year ago.
Now, I don’t know if it’s an excuse for the long wait (over a year!), but I can say that the image quality is exceptional. Take a closer look at the comparisons below.

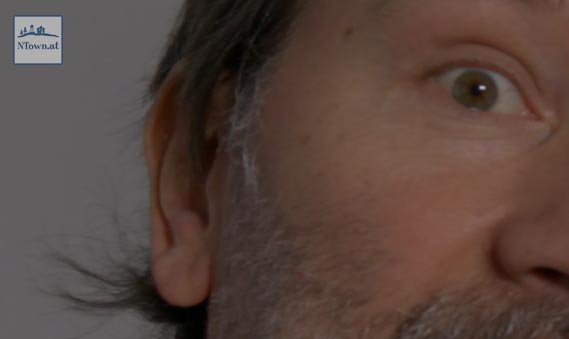
Theres is a strange image offset, I had to shift the Shogun CinemaDNG sequence 8 pixels horizontal and 8 pixels vertical to match the internal c-log2 recording (notice the black border below and right in the images above), I can not say if the root of this problem comes from the C300MkII raw output or from the Shogun.
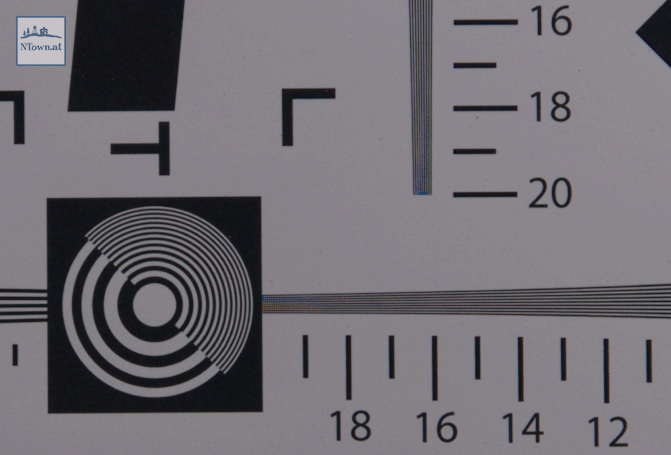
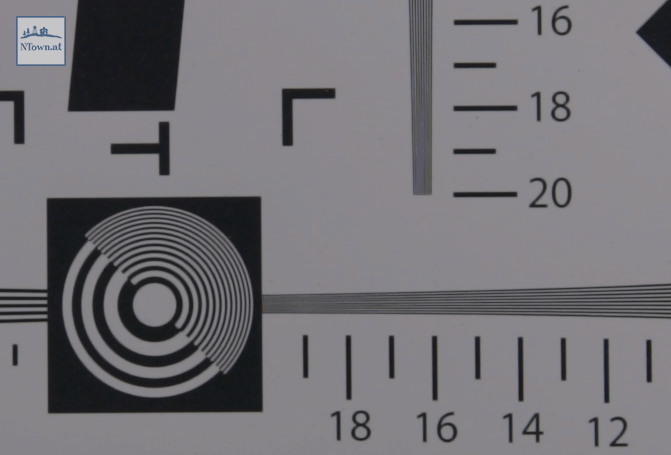
Below are cutouts of the UHD-4K image.


The images above are jpg crops from the 4K frame and still are a bit softer than the original which you can download below. This image sharpness is clearly not made for web compressions.
Sharpness is very fine, on pixel level and the only drawback is that you get funny artifacts on very small 2×2 contrasty bright and dark pixel patterns as you can see in the image sharpness test below.
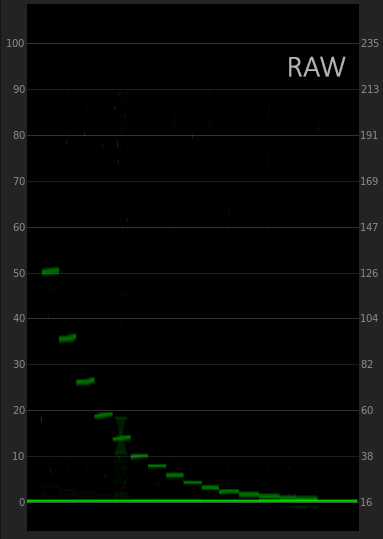
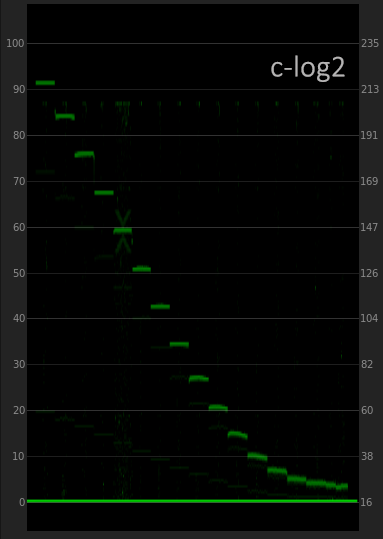
Brightness distributon
Unlike c-log2, the raw output does feature a much more linear brightness distribution curve. As seen in belows images the raw brightness coming right off the Shogun is at 50% IRE brightness and needs a different kind of grading treatment than the fairly simple c-log2.
 |
 |
Conclusion
Good Things
- great sharpness improvement
- color separation improvement
- automatic image noise reduction processing is off
Odd or Bad Things
- Frame Offset x:+8 y:+8 pixel when compared to the internal camera recording
- File naming of image sequence always “FRM_” instead of scene name (solved with ASSrenamer tool)
- Moire visible at very small structures (with Premiere internal Debayering)
Other discoveries
- colors are a bit cooler, especially the skintones
- image gammma is much more linear
Get the new Atomos firmware at the Atomos Support.
The BASE LUT I used for the Canon C300 Mark II RAW recordings is included in our Camera BASE LUT collection.
Feel free to comment below. Thanks and have fun.
| Subscribe to our Newsletter and get a special discount for our Webshop and a LUT Gift Package! |


Related Posts on NTown's Blog
 Canon EOS-5D MkIII RAW Movie Recording via MagicLantern
 Canon C100 vs Canon 7D RAWCanon C100 vs Canon 7D RAW
 Canon C300 Mark II / C700 Noise Reduction Motion Artifacts Problem
 Canon XC10 ISO Test
 Canon C300 Mark II Base Correction C-Log2 LUT Download
 Canon C100/C300 Custom Picture Profile Noise Comparison
 NTownFilmFlat Custom Picture Style for Canon DSLR

 Deutsch